Steve Spencer's Blog

Blogging on Azure Stuff

Automating Azure AD Entitlement Management with Graph API

This post builds on two previous posts: one that introduced Entitlement Management and the other that introduced the Beta version of Graph API. I will show what is available within Entitlement Management for automating with Graph API.

The documentation for Graph API is here and is currently in Beta so you will need to use the Beta libraries to access.

Let’s assume that you have already setup your access packages and want to make your own portal to allow users to select the packages they want.

You’ll want to list the packages that are available first to allow the user to pick the package they require. This can be done using the Access Packages endpoint

GraphServiceClient graphClient = new GraphServiceClient( authProvider );

var accessPackages = await graphClient.IdentityGovernance.EntitlementManagement.AccessPackages
     .Request()
     .GetAsync();

This will return a list of access packages the user can request access to. You will need to ensure that the user has been assigned the correct permissions: EntitlementManagement.Read.All or EntitlementManagement.ReadWrite.All

Graph API will also allow the user to request access to a package. For this the user will need to create a request using the Create accessPackageAssignment request

GraphServiceClient graphClient = new GraphServiceClient( authProvider );

var accessPackageAssignmentRequest = new AccessPackageAssignmentRequestObject
{
     RequestType = "AdminRemove",
     AccessPackageAssignment = new AccessPackageAssignment
     {
         Id = "a6bb6942-3ae1-4259-9908-0133aaee9377",
         TargetId = "46184453-e63b-4f20-86c2-c557ed5d5df9",
         AssignmentPolicyId = "2264bf65-76ba-417b-a27d-54d291f0cbc8"
     }
};

await graphClient.IdentityGovernance.EntitlementManagement.AccessPackageAssignmentRequests
     .Request()
     .AddAsync(accessPackageAssignmentRequest);

The code above was modified from the examples and more scenarios are available there too.

The following request types can be used:

  • UserAdd
  • UserRemove
  • AdminAdd
  • AdminRemove
  • SystemRemove

So the request can be used to add and remove assignments by either the User or an Admin.

You can view the assignments for a user by using the Access Package assignment endpoint:

GraphServiceClient graphClient = new GraphServiceClient( authProvider );

var filterByCurrentUser = await graphClient.IdentityGovernance.EntitlementManagement.AccessPackageAssignments
     .FilterByCurrentUser(AccessPackageAssignmentFilterByCurrentUserOptions.Target)
     .Request()
     .GetAsync();

These end points should be enough to get you started with automating Entitlement management but there are more features that could be automated if you require them. All the resources that are currently available can be found in the Entitlement management API documentation

Identifying where the credentials for an Azure AD B2B user originate

After a conversation with Microsoft where we were discussing users who are having issues signing in with B2B, I thought it would be good to share what I’ve learned.

When you using Azure AD  as the identity provider for your applications and are using B2B (Guest) accounts to allow external users to access your applications, you will at some point encounter users who are unable to sign in. There are a number of issues that could arise and the information against the users profile will help you to diagnose where the problem is likely to be.

If you go to the Azure AD portal and search for the user by their email address and click through to their profile, I’ve highlighted a number of areas of interest.

image

The box on the right shows whether the user has accepted the invitation or not. The bottom box shows whether the user has been blocked access to your Azure AD. Maybe they were a user previously on a different application and for some reason their access has been blocked. If this is the case then it is best to look at the Groups and Applications that the user is already assigned to before you unblock the user.

If the user has accepted the invitation then the final box (“View more”) will give you some useful information. Expanding the box will show you where the users B2B account originates:

image

This one shows the user has a Microsoft account.

The values can be:

  • Invited User: This user has been invited but has not yet redeemed an invitation.
  • External Azure Active Directory: This user is homed in an external organization and authenticates by using an Azure AD account that belongs to the other organization.
  • Microsoft account: This user is homed in a Microsoft account and authenticates by using a Microsoft account.
  • Windows Server Active Directory: This user is signed in from on-premises Active Directory that belongs to this organization.
  • Azure Active Directory: This user authenticates by using an Azure AD account that belongs to this organization

Further details can be found here

The source can help you to tailor your response to the user. For example, if the Source shows External Azure Active Directory, you know that the user is signing in with their corporate account and if they are having issues signing in then it is likely to be an issue at their end. If it shows Microsoft Account then they need to use the credentials they use to access their Hotmail, One drive or personal computer (if they have it connected to their Microsoft Account) and you can point them to the relevant pages for assistance.

Once they have signed in correctly they may still have issues accessing your application. You would need to look at the configuration of the application, Conditional Access (Note, conditional access could be an issue at their end, if their corporate IT have blocked B2B access at their end for example), group configuration etc.

I found that being able to identify where the users credentials are sourced meant that I could provide a far better support response to my customers and this resolved a lot of the issues.

Using Azure AD Conditional Access to Trigger MFA

Cloud hosted services and collaboration mean exposing services to a worldwide audience, but it also exposes you to malicious attacks and identity is one axis where attacks take place. Usernames and passwords are constantly being obtained either through hacking, social engineering or buying. Once obtained they can be used to gain access to a variety of system and single sign-on makes the scope of attacks larger. It has long been recognised that having multiple levels during authentication makes it harder for an attacker to gain access. Microsoft have been involved with identity for a long time now with their services such as Hotmail, XBox Live and Azure and they have used this experience to build and enhance their security models to incorporate Multifactor Authentication (MFA) into their systems. MFA allows you to use an additional piece of information that is usually generated at the point of entry and is not something that is remembered. This information is usually generated and presented on something that you have in your possession such as a Mobile Phone, RSA key or FIDO token. This adds an additional layer of protection as it means the attacker also requires the same device in order to gain access. When building your applications it is sensible to incorporate MFA into your design and Microsoft Azure has the Conditional Access service to help you build this extra layer of security into your applications.

Conditional Access allows you to create a set of rules (policies) about the access a user is attempting to determine whether the user is allowed access, whether they are required to user MFA or whether they are blocked from access. Conditional Access policies use a set of signals that could be things like being a member of a specific group; accessing a specific application; IP address/location information; the device they are using or if Identity protection is enabled there are a set of AI models applied that give the user or login a risk value.Rules are applied to these signals and a decision is made.

In order to use Conditional Access your Azure AD tenant will require a P1 license or Microsoft 365 Business Premium for each user. 

To setup Conditional Access Policies, navigate to the Azure Portal and search for Conditional Access

image

Click “New Policy”

image

You can configure the group membership requirements, which apps the rules apply to and the conditions that apply. When a user signs in each policy is evaluated to see which ones apply to the users. Each of the conditions are evaluated and any policies that match all the conditions will be applied to the user. This is an important point because if you make the policies too restrictive then a user may not match any conditions and they will be given access without applying any access controls. This is especially important if you are expecting access to be blocked if the conditions are not met, which is not the case. You will need to create a specific policy for that which blocks the access.

When creating a policy, enter a name for the policy and then click users and groups to determine who the rules apply to.

image

Here you can include or exclude sets of users. Whether its all users, your guess/external/B2B users, specific roles or specific users or groups. For example you may apply this rule to All users and exclude users who are members of a specific group. If you apply the rule to all users then you will get a warning that might cause you to lock you out of access. In this scenario you could exclude users who are part of the admin group so at least a small number of people will gain access.

image

Selecting a user or group brings up the user/group picker. Select a group.

In addition or instead of, you can pick an application or group of applications that will cause the policy to be applied if the user tried to access them. Whether you use this or groups will be down to you. It depends how you give access to the applications. If the number of groups to access the applications is complicated then you might want to apply the application here, if for example you use group membership to control access to the application then you can just use the same group in the policy instead of the application.

image

Picking the all applications has the same warning as all groups. For this policy we’ll just stick with group membership so will select None

The next part to pick is the condition for the policy.

image

Be aware here that both User risk and Sign-in risk can be applied here, but will only give you a valid value if Identity Protection is also enabled in your tenant.These conditions will return a percentage value based upon whether Identity Protection believes the user account has been compromised or the sign in attempt is not authorised. Information about the information monitored to generate the risk can be found here

Device platforms looks at the type of device that is trying to connect. This works well for machines that are internal to your organisation and are managed by Microsoft Intune device compliance policies. User agent strings will be used for External users , but these can be changed so are not a reliable condition for B2B users.

image

Locations allows you to configure trusted locations where access is allowed from and access is blocked if the access if from elsewhere. I’ll talk about this in a future post.

image

Client Apps allows you to configure which apps are allowed access and which are blocked.

image

Finally Device state

image

This allows you to exclude compliant devices from the policy.

image

Now you have configured all your conditions you now decide what action should be taken if those conditions are met. Here  you can grant or block access

image

There are more conditions that need to be met to allow access. MFA is one of these. Selecting MFA will force the user have to use a secondary authentication device before access can be gained. Unlike the policy conditions, failure to meet the conditions at this stage will block access. If a user manages to get through the conditions but doesn’t have a Hybrid joined device or fails the MFA challenge then they will still not gain access.

The final option is for Session which is used to determine whether the user needs to be challenged again for MFA. This can be set in the Sign-in frequency option:

image

Now we have a choice about how to apply the policy. Whether to enable it or set it to report only. If you have a complex set of criteria that you want to enable and not sure whether there will be issues you can set the policy to Report Only and this will appear in the sign in logs showing what the rule outcome will be. You can run it on the user population and review the logs to see if the policy breaks anything. This will also be the subject of a future post. For now we will set the policy to On and click Create. This will now be applied to all users and those that match the policy will be presented with the MFA challenge.

The policy we’ve just created will present all users who are NOT in the Alpha Team group with the MFA challenge and members of Alpha team will be allowed to sign in without MFA.

Its a good idea to plan your conditional access policies so that there are not too many complex policies that could end up with scenarios where users are given access without out the additional security of MFA. There are also limitations on the number of policies that can be applied to a user after which they policies are ignore. I believe the limit at the moment is 100 but I can’t find this in writing anywhere.

Conditional access allows you to build extra layers of security into your app and data access  processes and tailor the access model to suit your needs. The next posts will cover reviewing and diagnosing policies and also restricting access based upon IP addresses.

Delegating User Management using Azure Administrative Units

Azure Administrative Units allows an administrator in Azure to separate out the management of specific users and groups and delegate management to a specific set of users. This may be to allow for access to specific applications or to isolate the management of a specific set of users due legal restrictions based upon their location, nationality or the data they are accessing, for example. Azure Administrative units require and Azure AD Premium P2 license for each user you wish to delegate as an Administrator.

In order to separate out the users you must create an administrative unit, assign the users and groups you wish to managed to the unit and then assign users to be the admins.

In the Azure portal, navigate to the Azure Active Directory blade and click on “Administrative units”

image

To Create an Administrative unit click “Add”

image

Enter a name and description the press “Review + create”

image

You can assign the users you want to delegate the administration of the Administrative unit on this page, click “Review + create” as we will be assigning the admins later.

image

Now click “Create” & the Admin unit should now be created.

image

We now need to decide what and who we want to manage within this unit. Firstly we’ll add some groups. Click on the Admin unit then Click Groups

image

Click Add and select the groups you want to put in this Admin unit.

image

Then click “Select”

image

Now you can add your users, click “Users” & “Add member”

image

Select the users you wish to add to the Admin unit and click “Select”.

image

Now we have our Admin unit set up with two groups and two users. We now need to assign an administrator for this unit. Click “Roles and administrators”

image

This displays the different roles that can be used to manage the Admin unit. This allows you to have multiple administrators of the unit with different permissions. We’ll just create a single Administrator who is allow to manage the users into the groups we have assigned. Click “Group administrator”

image

Click description if you are unsure what the role does. You will get a description plus a list of the finer grained permissions included in the role. Click “Add assignments” and pick the user you wish to assign to this role, then click “Add”.

image

You can repeat this for the other roles if you wish. Your admin unit is now setup.

Now login with the administrator of the admin group who you added previously. This user will need to have already been assigned the Azure AD Premium P2 license and the user should be able to assign Fred and Jane to the groups Application 1 and Alpha Team.

In Azure AD, click Users, then click Fred.

image

Now click “Groups”, then “Add memberships”

image

and select “Alpha Team” and click “Select”.

image

Alpha Team should now be assigned to Fred.

Click “Add memberships” again, but this time select the “Beta Team” group and click “Select”

image

You will see a notification saying that you do not have the correct privileges to manage that group. Similarly if you try to add any user other than Jane or Fred to any of the groups you will get the same error.

So,by using Azure AD Administrative units I’ve shown how you can delegate the management of certain groups and users to specific individuals. Administrative groups will allow you to organise the management of your Active Directory and delegate management, helping you to reduce the risk by providing the user management with a lower level of privilege than just by giving all your users administrators the global Group Administrator role. This will allow you to partition off sensitive groups and applications and restrict the users who are able to manage those, whilst extending the administration to a wider set of users.


Custom Application Roles in Azure AD

Previously I’ve talked about how you can control access to your web applications in Azure AD (Part 1 & Part 2) and also how to use Role Based Access Control (RBAC) to manage access to resources in Azure. This post will build on these previous posts and show you how you can create your own custom roles for use in your own web applications and how you can use these roles to control access to parts of your application.I’ll use the same example used in Part 1.

Firstly you need to created the roles for your application to use, assign the roles to users and finally change your code to make it role aware.

To add roles to your application. Navigate to the Azure portal and click on Azure Active Directory and App Registrations. Select the Web App you created previously.

image

Click on “App roles | Preview” then “Create App Role”

image

Enter the role information and click Apply and repeat for all the roles you require.

You should now see your roles in the grid:

image

I’ve added a standard user role and a test administrator role.

To assign these roles to users, Navigate to the Enterprise Applications blade and click your application. Then select “Users and groups”

image

To Add roles to an existing assigned user, tick the user and then click “Edit”

image

Select the role and click “Select”

image

You should now see the role is assigned to the user. Similarly to add a role to a new user click “Add user”

image

This time you need to select the new user and then the role:

image

You can add multiple roles to a user by repeating the Add user process.

image

Here I’ve added both new roles to one user.

You are now ready to user these roles in your application.

The sample code already shows how to view the claims for a user.

image

When I sign in to the application with the user that has two roles I see the following entries in the claims table:

image

Adding the roles to the application and the assigning the roles to a user is enough to make them appear as roles in your application when the user signs in. There is a limit to the number of roles that an application can have. These are stored in the manifest of the App Registration. There is a limit of 1200 items in the App Registration Manifest and this includes all the configuration items not just roles.

There are a number of ways in which you can use Roles in code. Firstly in your views you can add conditional code to limit what a standard user can see

@if (Request.IsAuthenticated && User.IsInRole("Test.Admin"))

{

<h2>You Are An Admininstrator</h2>

<br />

}

When you sign in with the Test,Admin role you will get this additional text which is not visible for the User role

image

You can also control access at the controller and controller action levels by adding the Authorize attribute on the controller or controller action:

[Authorize(Roles = "Test.Admin ")]

public class ClaimsController : Controller

{

or for multiple roles

[Authorize(Roles = "Test.Admin,User")]

public class ClaimsController : Controller

{

at the action level:

[Authorize(Roles = "Test.Admin")]

public async Task<ActionResult> Index()

{

}

or both

[Authorize(Roles = "Test.Admin,User")]

public class ClaimsController : Controller

{

        [Authorize(Roles = "Test.Admin")]

        public async Task<ActionResult> Index()

        {

        }


        [Authorize(Roles = "User")]

        public async Task<ActionResult> Index2()

        {

        }

}

In this example the user needs either the User or Test.Admin role to access the controller but only the Test.Admin role can access the Index action and the User role can access the Index2 action. This allows you to put controls in at multiple levels and provide a more custom experience for your users.

App Roles makes it easy to add custom roles to your application. If you have a higher Azure AD subscription you can assign these roles to groups and assign the groups to the applications. This means that you can add users to groups to assign the roles rather than adding them to each individual user. I can have a Standard user group that has the User role assigned and all users in that group will have the User role passed through to the application.

You now have Role Based Access control in your Azure AD application and can start to build your application features out based on the roles you define.

Using the Azure Graph API Beta to add an Application Role Assignment

In an earlier post I talked about using Graph API to invite users using B2B and add them to groups. In this post I am introducing the Beta version of the API. This has additional functionality that is currently not released. Microsoft have provided documentation for the Graph API which currently defaults to V1.0. See https://docs.microsoft.com/en-us/graph/api/overview

To see the Beta documentation there is a version drop down list which allows you to select either V1.0 or the Beta version.

clip_image002

Just like the release version of Graph API you install the C# Graph API Beta using a nuget package: Microsoft.Graph.Beta

The code samples in here will work in both the Beta and released version but I wanted to show the difference between using the Beta API but also show you something you can use in production.

The scenario I am going to show is Adding a user to an Azure AD application.

First you will need a client to access the Beta Graph API. With the Beta API nuget package installed this automatically uses the Beta client.

ConfidentialClientApplicationOptions _applicationOptions = new ConfidentialClientApplicationOptions

{

        ClientId = ConfigurationManager.AppSettings["ClientId"],

        TenantId = ConfigurationManager.AppSettings["TenantId"],

        ClientSecret = ConfigurationManager.AppSettings["AppSecret"]

};

var confidentialClientApp = ConfidentialClientApplicationBuilder

                                                .CreateWithApplicationOptions(_applicationOptions)

                                                .Build();

ClientCredentialProvider authProvider = new ClientCredentialProvider(confidentialClientApp);

GraphServiceClient betaGraphClient = new GraphServiceClient(authProvider);

This creates a Beta graph client with application scope.

To add an application role assignment to a user we need access to the Service Principles endpoint. Looking at the API documentation for List Service Principles we need an Application permission of Directory.ReadAll,

clip_image004

Create and Update Service Principles requires Directory.ReadWriteAll

clip_image006

We can to add the permission to the Graph API application of Directory.ReadWriteAll and Grant Admin consent to the permissions we set up in the previous post. This will also cover the List API call.

clip_image008

Without these permissions adding any calls to the Service Principle endpoint would return unauthorised.

In order to add an application role assignment we need to first obtain the user:

var user = (await betaGraphClient.Users.Request(options)                                                         

                            .Filter($"mail eq '{testUserEmail}'")

                           .GetAsync()).FirstOrDefault();

Then find all the app role assignments for the application we are interested in to see if the user is already assigned. To get the role assignments we call the service principle endpoint and expand the approleassignedto property:

var app1ServicePrincipals = await betaGraphClient.ServicePrincipals

                                                                .Request()

                                                                .Filter($"appId eq '{testApp1}'")

                                                                .Expand("approleassignedto")

                                                                .GetAsync();

var app1RoleAssignment = (from ra in app1ServicePrincipals[0].AppRoleAssignedTo

                                             where ra.PrincipalId.ToString() == user.Id

                                             select ra).FirstOrDefault();

If we want to remove the role assignment then we call the DeleteAsync method.

if (app1RoleAssignment != null)

{

        await betaGraphClient.ServicePrincipals[app1ServicePrincipals[0].Id]

                                               .AppRoleAssignedTo[app1RoleAssignment.Id]

                                               .Request()

                                               .DeleteAsync();

}

To Add a role assignment to the application call the Add endpoint:

app1RoleAssignment = new AppRoleAssignment

                                      {

                                           CreationTimestamp = DateTimeOffset.Now,

                                           PrincipalDisplayName = user.DisplayName,

                                           PrincipalId = Guid.Parse(user.Id),

                                           PrincipalType = user.UserType,

                                           ResourceDisplayName = app1ServicePrincipals[0].DisplayName,

                                           ResourceId = Guid.Parse(app1ServicePrincipals[0].Id),

                                           AppRoleId = Guid.Empty

                                      };

await betaGraphClient.ServicePrincipals[app1ServicePrincipals[0].Id]

                                                                 .AppRoleAssignments

                                                                .Request()

                                                                .AddAsync(app1RoleAssignment);

To see the role assignments that the user now has find all the appRoleAssignments that contain the users id:

var roleAssignments = servicePrincipals.SelectMany(x => x.AppRoleAssignedTo).ToList();

var appRoleAssignments = from ra in roleAssignments

                                            where ra.PrincipalId.ToString() == user.Id

                                            select ra;

foreach (var ra in appRoleAssignments)

{

        Console.WriteLine($"[{ra.PrincipalDisplayName}] [{ra.ResourceDisplayName}]");

}

This should show the same information you can see when you look in Azure AD at the User’s applications:

clip_image010

Features and tools may change between Beta and Production. The code above changed slightly when moving to productions but the easiest way to see is to remove the Beta nuget and add the production one. The only change I had to make was to change the CreationTimeStamp to CreatedDateTime = DateTime.Now.

Information about which features are in Beta and which are in production can be found here: https://docs.microsoft.com/en-us/graph/whats-new-overview

Using Graph API to automate Azure AD

In my previous posts I discussed how you can manage access to applications (part 1) using Azure AD and also how you can add users users from outside of your organisation (part 2). Now we will look at how you can automate this using Graph API.

“The Microsoft Graph API offers a single endpoint, https://graph.microsoft.com, to provide access to rich, people-centric data and insights exposed as resources of Microsoft 365 services. You can use REST APIs or SDKs to access the endpoint and build apps that support scenarios spanning across productivity, collaboration, education, security, identity, access, device management, and much more.” - https://docs.microsoft.com/en-us/graph/overview

From the overview you can see that Graph API covers a large area of Microsoft 365 services. One of the services it covers is Azure AD. What I’ll show you today is how to invite users and then add/remove them to/from groups using Graph API.

There are two ways to access Graph API. A user centric approach (Delegated) that requires a user account and an application centric approach that uses an application key and secret. Accessing Azure AD for user invite and group management utilises the application centric approach. In order to get an application id and secret you will need to create an application in Azure AD. The first post in the series talks about how to create an App Registration.

Once you have created your application, there are a couple of bits of information you require in order to get started. These are the tenantId and clientId. These can be found in the Azure portal. Navigate to your App Registration and the details can be found in the Overview blade.
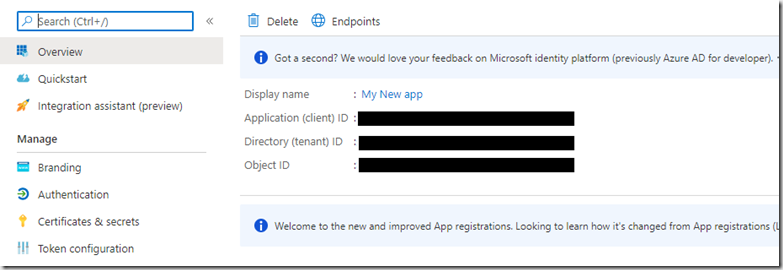
image

If you hover over each of the Guids a copy icon appears to allow you to easily copy these values.

Next you will need a key generating. For this you click on the Certificates and secrets blade.
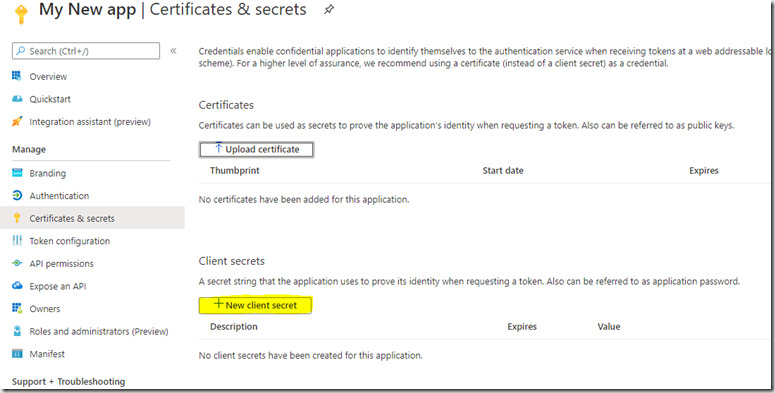
image

Then click “New client secret” and populate the form and click “Add”
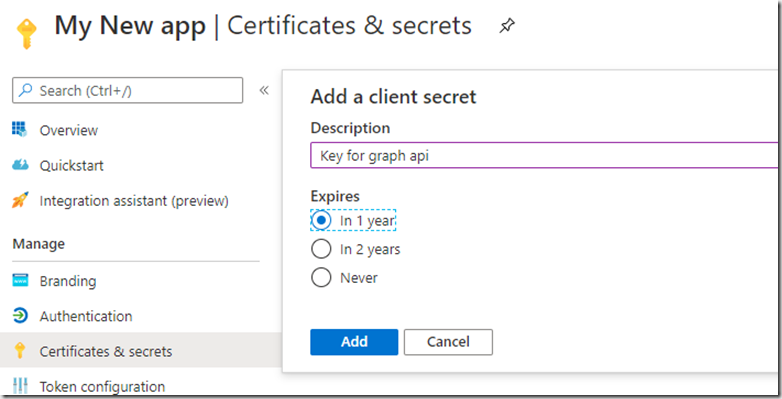
image

Your key will now appear.

image

Make sure you copy this as it is not visible again once you navigate away and you will need to generate a new one.

image

We are now ready to start looking at Graph API. There is good documentation about each of the functions in Graph API including the permissions required to access and code samples in a variety of languages. If we look at the list User function:

https://docs.microsoft.com/en-us/graph/api/user-list?view=graph-rest-1.0&tabs=http
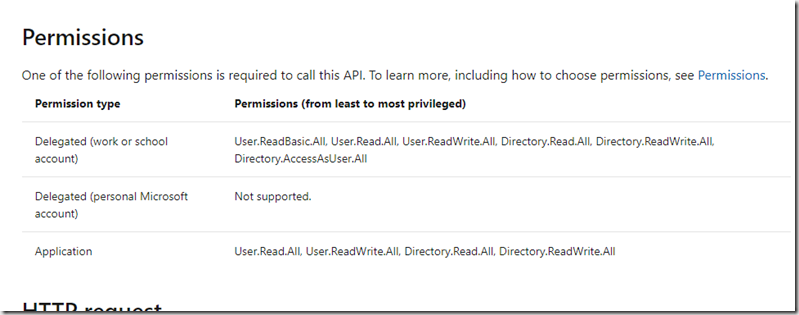
image

You can see the permissions needed to access this function. As we are using an Application permission type we need to set one of the permissions: User.Read.All, User.ReadWrite.All, Directory.Read.All or Directory.ReadWrite.All.

You can set the permissions required by going to your App Registration and clicking on the “API permissions”
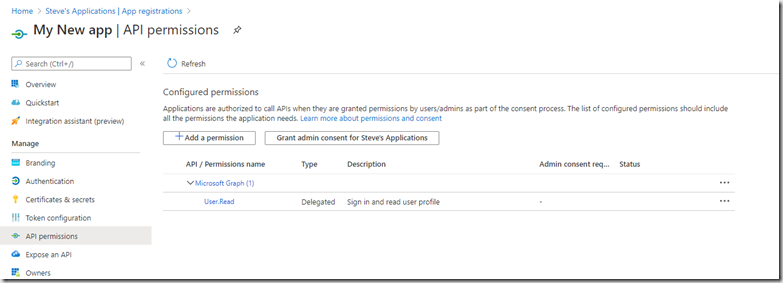
image

The application by default requires a user login that can read their own user profile. We need to add some additional permissions to allow our application to list the users in AD.Click on “Add permission”

This shows the list of built-in API’s that you can access. We are only looking at Microsoft Graph today
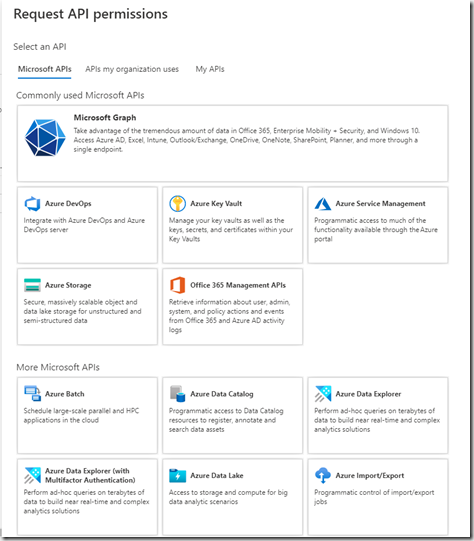
image

Click “Microsoft graph”

image

Then “Application permission” and scroll to the User section
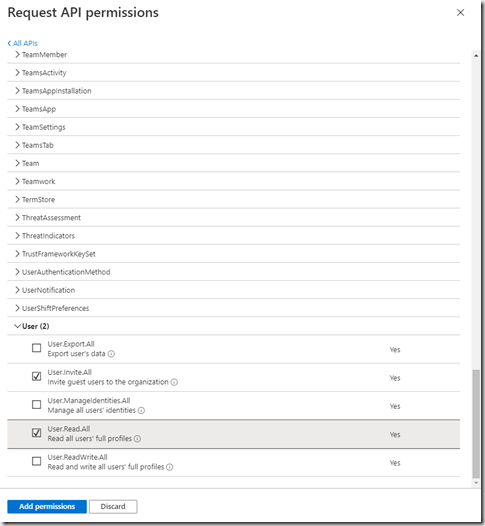
image

To list users we need the User.Read.All permission, but we’ll also add the User.Invite.All so that we can invite B2B users. click “Add permissions”.
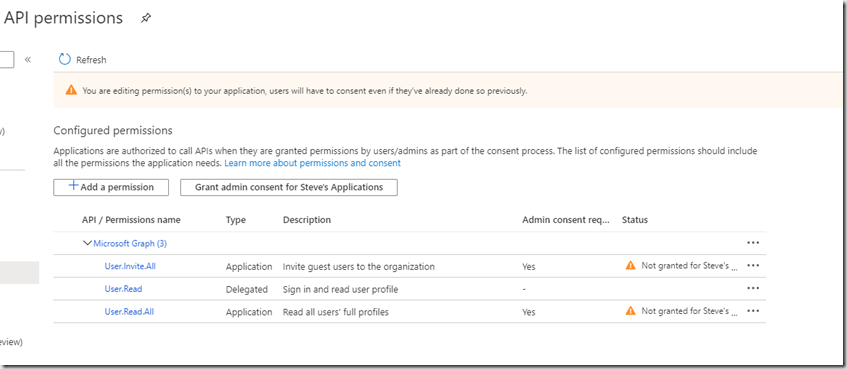
image

Although you have added the permissions you cannot currently access the Graph API as you will need to Grant admin consent in first. If we had  added a Delegated permission then the user could try an access the Graph API but Admin consent would be required to stop anyone from accessing certain features. This can be done in a workflow with selected Admins being notified of access. Before the use can access an Administrator would need to approve each access. This process will not work for our application as it is an unattended application using the application permission type. We can however grant access to this application user by clicking “Grant admin consent …” button and clicking Yes to the message box that pops up.
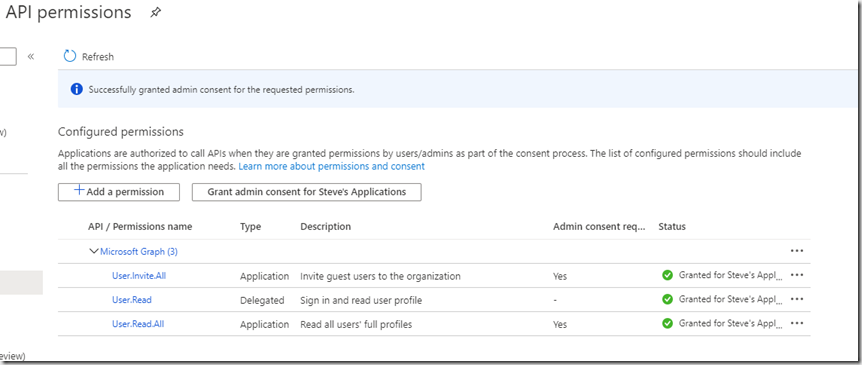
image

Clicking the button adds admin consent to all permissions. If you want to remove it from any, click the ellipsis (…) at the end and click “Revoke admin consent”

image

You can also remove permissions from this menu.

Your user is now ready to go. I’m using the C# SDK and this is available as a nuget package

Once the nuget package is installed. You will need to create an instance of the Graph API client:

ConfidentialClientApplicationOptions _applicationOptions = new ConfidentialClientApplicationOptions
{
     ClientId = ConfigurationManager.AppSettings["ClientId"],
     TenantId = ConfigurationManager.AppSettings["TenantId"],
     ClientSecret = ConfigurationManager.AppSettings["AppSecret"]
};


// Build a client application.
IConfidentialClientApplication confidentialClientApplication = ConfidentialClientApplicationBuilder
                 .CreateWithApplicationOptions(_applicationOptions)
             .Build();


// Create an authentication provider by passing in a client application and graph scopes.
ClientCredentialProvider authProvider = new ClientCredentialProvider(confidentialClientApplication);


// Create a new instance of GraphServiceClient with the authentication provider.
GraphServiceClient graphClient = new GraphServiceClient(authProvider);

You will need the ClientId, TenentId and Secret you copied earlier. Looking at the Graph API documentation there are example of how to use each of the functions.
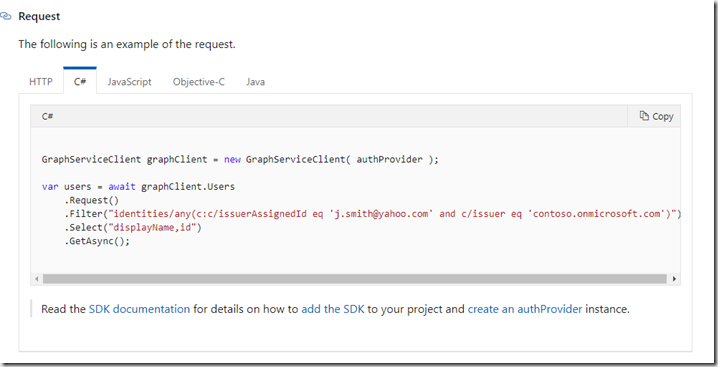
image

We want to see if a user existing in our AAD before we invite them, so we will use the filter option as above.

var user = (await graphClient.Users
                 .Request(options)
                 .Filter($"mail eq '{testUserEmail}'")
                 .GetAsync()).FirstOrDefault();

Console.WriteLine($"{testUserEmail} {user != null} {user?.Id} [{user?.DisplayName}] [{user?.Mail}]");

If user is null then is does not exist in your AzureAD tenant. Assuming that this is an external user then you will need to invite the user to be able to access your application. I created a method for this:

private async Task<Invitation> InviteUser(IGraphServiceClient graphClient, string displayName, string emailAddress, string redirectUrl, bool wantCustomEmaiMessage, string emailMessage)
{
     // Needs: User.InviteAll

    var invite = await graphClient.Invitations
                     .Request().AddAsync(new Invitation
                     {
                         InvitedUserDisplayName = displayName,
                         InvitedUserEmailAddress = emailAddress,
                         SendInvitationMessage = wantCustomEmaiMessage,
                         InviteRedirectUrl = redirectUrl,
                         InvitedUserMessageInfo = wantCustomEmaiMessage ? new InvitedUserMessageInfo
                         {
                             CustomizedMessageBody = emailMessage,
                         } : null
                     });

    return invite;
}

Now you’ve just invited a B2B user into your Azure AD tenant. At the moment they do not have access to anything as you’ve not assigned them to any application. The Graph API for assigning users to applications uses the delegated permissions model which means you need to use an actual user account. The Graph API with the application permission model does not support adding users to applications. In order to use the same application client you used for inviting users, you could assign a group to your application and then use the Graph API to add/remove users to/from that group.

Adding/removing a user to/from a group requires one of the following permissions: GroupMember.ReadWrite.All, Group.ReadWrite.All and Directory.ReadWrite.All. This is set in the same way as for the user permissions in the App Registration/Api permission section mentioned earlier. Admin consent will also need to be granted for these permissions.

The code to add & remove users is below:

// find group
var groupFound = (await graphClient.Groups
                                         .Request()
                                         .Filter($"displayName eq '{groupName}'")
                                         .Expand("members")
                                         .GetAsync()).FirstOrDefault();

Console.WriteLine($"{groupName} {groupFound != null } [{groupFound?.Id}] [{groupFound?.DisplayName}] [{groupFound?.Members?.Count}]");

if (groupFound != null)
{
     // check is the user is already in the group
     var user = (from u in groupFound.Members
                 where u.Id == user.Id
                 select u).FirstOrDefault();
     Console.WriteLine($"user Found {user != null}");

    if (user != null)
     {
         Console.WriteLine($"removing user {user.Id}");
         // remove from group
         await graphClient.Groups[groupFound.Id].Members[user.Id].Reference
                                     .Request()
                                     .DeleteAsync();

    }
     else
     {
         Console.WriteLine($"adding user {user.Id}");
         // add to group
         await graphClient.Groups[groupFound.Id].Members.References
             .Request()
             .AddAsync(new DirectoryObject
             {
                 Id = user.Id
             });
     }
}

In the code above I wanted the Graph API to return me the list of users in the group. By default you do not see this data when retrieving group information. Adding the Expand method tells Graph API to extend the query and return the additional data. This is something to bear in mind when using Graph API. Just because the data is null does not mean that there is no data, you might need to expand the data set returned.

I hope you found this a useful introduction to Graph API, I will be posting more on Azure AD in the future including more on Graph API.

Managing Application Access with Azure AD–Part 2

In my previous post I showed you how to set up an application in Azure AD and allow Azure AD users to access it. In this post I will show how you can give access to these applications to users outside of your organisation using B2B (Business to Business) as guest users.

B2B is a feature of Azure AD that allows you to easily add two types of user to your applications.

  1. Users who are part of another Azure AD tenant
  2. Users who are not.

If your new user is part of another Azure AD tenant, then when we add them as a guest user to you application and they will use the credentials provided by their own organisation. This means they do not have to remember a new username and password when they want to access your application. It is also useful as they will be managed by their own organisation so you will not be responsible for resetting their passwords for example. Another advantage of using their own Azure AD credentials is that they will lose the ability to sign in to your application when their accounts are disabled or removed from your customer’s tenant. They will however still exist as a guest user in your application but they will no longer be able to sign in.

If your new user is not part of another Azure AD tenant, then they will automatically have a Microsoft account created for them. They will also be prompted to enter a new password. Again this is not managed by you but by Microsoft this time, so password resets are handled by a link provided by them.

To assign a guest user to your application you will need to invited them to use your application. They will then receive an invitation via email that they will need to redeem in order to access your application.

So, go back to the Azure AD blade of the Azure portal and click on Users:

Home ) Default Directory > Users All users 
a 
Users I All users 
Default Direct'bqj - Azure Active Director,' 
All users 
Deleted users 
Password reset 
+ New guest user 
New user 
Search users 
Name 
T Bulk create Bulk invite 
Add filters 
user name 
Bulk delete 
Download users 
user type 
Refresh 
p Reset passwo 
Source

The click on “New guest user”

Home > Default Directory > Users I All users > New user 
New user 
Default 
C) Got feedback? 
o 
Create user 
Create a new user in your organization. 
This user will have a user name like 
alice@sdspencergmail.onmicrosoft.com. 
I want to create users in bulk 
Invite user 
Invite a new guest user to collaborate With 
your organization. The user will be emailed 
an invitation they can accept in order to 
begin collaborating. 
I want to invite guest users in bulk 
Help me decide 
Identity 
Name C) 
Email address* @ 
First name 
Last name 
Personal message 
Invite 
Example: •Chris Green' 
xample: chris@contoso.com

Fill in the form and enter your own personal message and click  “Invite”. You need to enter a valid email address otherwise the user will not be able to receive the invite, as seen below:

image

The text highlighted inside the red box was the custom message I entered in the invitation process. It is possible to change the branding of this email but it is an Azure AD premium feature.

The invite process proves that the user has access to the mail box linked to the email address used. Also, if they are using their organisations Azure AD email address then they must also sign in with their own username an password so you can be confident that they user is who they say they are. This example shows the flow when a user is part of another Azure AD tenant. If the user is not part of another tenant then there will be additional screens for setting up their new Microsoft account and password.

When the user clicks the Accept invitation link they will be redirected to a consent page which is asking for permissions to read their user profile from their Azure AD tenant.

image

Accepting the permissions then will redirect the user to the application portal where the user can access the applications they have been assigned. As we have not allocated any applications to this user yet, they will not see anything,

image

To assign applications to the users, go back to the Azure AD blade in teh Azure portal and click on Users then click on the one you have just added to view their profile:

image

You can see, in this example, in the red box that this is a Guest user who has accepted the invitation.

Click on applications in the left hand menu bar you will see that there are none assigned. To assign this user to an application, navigate back to the Azure AD main blade and click Enterprise applications, then select the application you wish to assign this user to.

image

Click “Assign users and groups”, then Add User

image

Click “None Selected” then search for your new user, select them and click Select.

image

Now click Assign

image

The new users is now assigned. Go back to the  Application screen the user viewed after they signed in and refresh the page

image

The assigned application should now be visible and clicking the application will redirect the user to that applications web site.

Using Azure AD it is easy to now invite users to user your applications and when they are part of another Azure AD tenant, Azure AD takes all the pain out of federating with these new users tenants. Hopefully you have found that this is straight forward and this will have opened up access to your applications in a controlled way. My next post will look at how we can automate this using Graph API.

Introduction to Azure Role Based Access Control (RBAC)

Up until fairly recently I have been managing  access to a number of Azure subscriptions but as I’ve been working for smaller organisations the number of people who needed access was fairly small and easy to manage. It also meant that I generally gave the users Owner or Contributor access to the subscriptions as we were all managing everything so we needed the access at that level. Now I work for a large organisation there is a greater need to  limit access to certain areas of Azure and giving subscription wide access is limited to a few key administrators. This means that I need to look at the minimum access that is required for each of the users who need access to the resources. First I’d like to talk about the scope within which permissions can be set within Azure. For most of the scenarios I’ve worked in I have visibility of a single subscription. For organisations  with a large number of subscriptions there is a further level of scope, Management group, which I won’t be discussing.

image

Permissions can be set at the Subscription, Resource group or the individual resource scope.Depending upon the level of access your user requires there are three basic levels which you can use

  • Owner
  • Contributor
  • Reader

Owner gives the user full access to everything within the scope and can also assign roles to other users.

Contributor gives the user full access to everything within the scope except they are not able to assign roles to other users

Reader give the user access to view the resources within the scope but they are not able to change anything or assign roles.

So assigning the user the Owner role at the Subscription level, then the user can manage all resources within the subscription and assign roles to users. A user can be assigned multiple roles and Azure RBAC is additive so if a user was assigned Contributor at the subscription scope but only Reader on one of the resource groups, the Contributor role would override the reader role. It is also possible to have Deny role assignments. Where a user is Denied permissions on a specific role. Deny assignments take precedence over role assignments.

These roles plus the variety of scopes give some flexibility of access but it is still a large surface area of access that is provided. Azure offers a large number of finer grained roles to allow users to be given specific permissions to specific services. There are a large number of built in assignments as can be seen here: https://docs.microsoft.com/en-us/azure/role-based-access-control/built-in-roles

These finer grained roles allow you to set specific permissions on a specific user within a specific scope. For example if  you wanted to give a user access to a blob store to upload files via the Azure portal there are two permissions that can be set: Reader and Data Access and

Storage Blob Data Contributor. If you assign these two roles to a user in the storage account, then the user is able to login to the Azure portal and navigate to the storage account and access the blob store.

To do this, navigate to the storage account within which you want to assign a role and click the access control item

image

The click “Add role assignment”

image

In the role drop down pick “Storage Blob Data Contributor”, select the user you want to assign the role to and click save. Repeat this for the Reader and Data Access role. Your user now has access only to blob storage and has no access elsewhere in the resource group or subscription. I could have done the same thing by selecting the resource group and Access control and adding these roles there. This would have give the user access to all blob stores within the resource group.

Another example is that you may want to give someone access to your app service so that they can configure and deploy. So navigate to your App Service and click “Access control”, then select the role “Website Contributor”. See https://docs.microsoft.com/en-us/azure/role-based-access-control/built-in-roles#website-contributor for more details. This lets you manage the selected website but not app service plans and no other web sites. If you want to manage other app services then you could add the same role at the resource group level.

Managing Application Access with Azure AD – Part 1

In my next series of blog post I want to talk about how to manage access to applications using Azure AD.

I’ve been looking at how I can set up access to my web based applications and I want to be able to:

  1. Have a single sign on with multiple applications
  2. Allow some users access to only some of the applications
  3. Be able to give access to users outside of my organisation
  4. Be able to control access via code

Part 1 will cover setting my applications up and then restricting access to the applications via Azure AD.

In order to test this I needed to have a number of applications that I could use. I used this example:

https://github.com/AzureADQuickStarts/AppModelv2-WebApp-OpenIDConnect-DotNet

It allows me to login and see my claims. I deployed this into two different app services so I could navigate to them separately. I’m not going to talk about the code on the web side apart from the bits you need to configure up the sample. This series of blogs are more about how to setup Azure AD and the path I went through to my end goal of configuring up users programmatically.

In order to integrate with Azure AD we need to set up each of the applications. This will provide us with an ID with which we can  use to configure each of the applications.

In Azure Portal navigate to Azure Active Directory, or search for it in the search bar

C portal-azure.com/#home 
Microsoft Azure 
p Search resources, services, and docs (G./) 
Azure services 
Create a 
resource 
Azure Active 
Directory 
SQL databases 
Azure AD 
Privileged. 
App 
registrations    C portal-azure.com/#home 
p activd 
Microsoft Azure 
Services 
Azure s 
Azure AD Privileged Identity Management 
-+ Activity log 
Azure Active Directory 
reso HDlnsight clusters 
e Monitor

Home > Default Directory I Overview 
O Default Directory I Overviev 
Azure Active Directory 
p Search (Ctrl 4/) 
O Overview 
Getting started 
Diagnose and solve problems 
Manage 
users 
Organizational relationships 
Roles and administrators 
Enterprise applications 
Devices 
App registrations 
Identity Governance    Home > Default Directory App registrations 
Default Directory I App registrations 
Active 
Search (Ctrl *

In the menu bar on the left select App Registrations –> New registration and complete the form:

Home ) Default Directory App registrations ) Register an application 
Register an application 
-k Name 
The user-facing display name for this application (this can be changed later). 
My New app 
Supported account types 
Who can use this application or access this API? 
@ Accounts in this organizational directory only (Default Directory only - Single tenant) 
O Accounts in any organizational directory (Any Azure AD directory - Multitenant) 
O Accounts in any organizational directory (Any Azure AD directory - Multitenant) and personal Microsoft accounts (e.g. Skype, Xbox) 
Help me choose... 
Redirect URI (optional) 
We'll return the authentication response to this URI after successfully authenticating the user. Providing this now is optional and it can be 
changed later, but a value is required for most authentication scenarios. 
web 
v http /mynewapp.azurewebsites.net 
gy proceeding, you agree to the Microsoft Platform Policies 
Register

I've picked single tenant as I want to invite users using B2B. Now click Register

You need to copy the ID's needed for your web app:

Delete Endpoints 
O 
Got a second? We would love your feedback on Microsoft identity platform (previously Azure AD for developer). * 
Display name 
Application (client) ID 
Directory (tenant) ID 
Object ID 
My New app 
Supported account types 
: My organization only 
Redirect URIS 
: I web, O public client 
Application ID URI 
: Add an Application ID URI 
Managed application in My New app

Copy the Client ID and Tenant ID. Repeat this process for the next app. I've created two apps as I wanted to test limiting access to a single app and deny access to the second if the users has not been invited to it or added manually.

Now add these to the web.config in the sample app. There will be two settings for ClientId and Tenant. Make sure that the redirect url matches the url of the application you registered and redeploy. Repeat this for the second application.

If you navigate to the web apps and try and login, you may get an error as we haven't setup any users, although any users currently in your Azure AD should be able to login.

To give users access to your app. Go back to Azure Active Directory and this time select Enterprise Applications and click on the app you just created.

Home 
) Default Directory > Enterprise applications All applications > My New app I Overview 
My New app I Overview 
Enterp•ise Application 
rvlew 
Diagnose and solve problems 
Manage 
Properties 
Owners 
Users and groups 
Provlston•ng 
Application proxy 
Splf_+ruire 
Properties 
O 
Name 
MN 
My New app 
Application ID 
Object ID Q) 
Getting Started

Click Users and groups

My New app I Users and groups 
Enterprse Applicat& 
+ Add user 
Edit Remove p Update Credentials 
Overview 
O 
The application will appear on the Access Panel for assigned users. 
Diagnose and solve problems 
irst 100 shown, to search all users & groups, enter a display nami 
Manage 
Display Name 
Properties 
NO application assignments found 
Owners 
Users and groups 
provisioning

Click Add user

Home > Default Directory > Enterprise applications I All applications > My New app Users and groups > Add Assignment 
Add Assignment 
Default 
Groups are not available for assignment due to your Active Directory plan level. 
Users 
None Selected 
Select Role 
Default Access

Click None Selected, pick users from the list and click Select. These users have now been given access to your application. However, as I mentioned earlier all users who are part of your Azure AD currently are able to login to your web app, we need to now configure the app so that only assigned users can access it.

Click Properties in your enterprise application and set User Assignment required to yes and click Save. (repeat this for your other application)

Home Default Directory 
My New app I 
Enterprise Applicati'H 
Overview 
> Enterprise applications I All applications > My New app I Properties 
Properties 
Save Discard Delete 
Enabled for users to sign-in? O 
Diagnose and solve problems 
Manage 
properties 
Owners 
Users and groups 
provisioning 
Application proxy 
Self-service 
Security 
Conditional Access 
permissions 
Token encryption 
Name * (D 
Homepage URL G) 
Logo @ 
Application ID O 
Object ID O 
User assignment required? C) 
Visible to users? O 
My New app 
MN 
Select a file

Now only users who are assigned to your application can login. You can test this now. Go to the first application url and login with one of the users you assigned. Then go to the second app (you shouldn't have assigned any users just yet.) and login. This time you will get an error.

You can now assign users to the second application and the error should go away when you attempt to login.

We’ve now set up our applications in Azure AD and limited access to each application. In my next post I’ll show you how you can then add users from outside of your organisation to these applications.