Steve Spencer's Blog

Blogging on Azure Stuff

Windows Azure AppFabric Access Control and Cache Services Commercial Release

The first production version of the windows Azure caching service and a new production version of the Access Control service have been released. The following link provides the necessary information

http://blogs.msdn.com/b/windowsazureappfabric/archive/2011/04/11/announcing-the-commercial-release-of-windows-azure-appfabric-caching-and-access-control.aspx

In conjunction the Windows Azure Platform Training Kit and the Identity Developer Training Kit have both also been updated.


The Windows Azure Platform Training Kits adds some new labs:

  • Authenticating Users in a Windows Phone 7 App via ACS, OData Services and Windows Azure lab
  • Windows Azure Traffic Manager lab
  • Introduction to SQL Azure Reporting Services lab
  • Loading

    Steve Spencer's Blog | Enabling Modern Apps

    Steve Spencer's Blog

    Blogging on Azure Stuff

    Enabling Modern Apps

    I’ve just finished presenting my talk on “Successfully Adopting the Cloud: TfGM Case Study”and there were a couple of questions that I said I would clarify.

    1. What are the limits for the numbers of subscriptions per service bus topic. the answer is 2000. further details can be found at:http://msdn.microsoft.com/en-us/library/windowsazure/ee732538.aspx

    2. what are the differences between Windows Azure SQL database and SQL Server 2012. The following pages provide the details:

    Supported T-SQL: http://msdn.microsoft.com/en-us/library/ee336270.aspx

    Partially supported T-SQL: http://msdn.microsoft.com/en-us/library/ee336267.aspx

    Unsupported T-SQL: http://msdn.microsoft.com/en-us/library/ee336253.aspx

    Guidelines and Limitations: http://msdn.microsoft.com/en-us/library/ff394102.aspx

    3. Accessing the TfGM open data site requires you to register as a developer at: http://developer.tfgm.com

    Thanks to everyone who attended I hope you found it useful.

    Loading

    Steve Spencer's Blog | Moving an Azure Website to a separate set of Virtual Machines

    Steve Spencer's Blog

    Blogging on Azure Stuff

    Moving an Azure Website to a separate set of Virtual Machines

    When an Azure Website is created and is in production it will most likely be running in a Standard or Basic configuration. These are both sets of Virtual Machines and can be shared across your websites. In the old portal you could only scale the group of websites together but the new Azure Management portal now allows you to move your websites on to different virtual machines so that if one site is more heavily loaded than others it can be scaled out separately if required. The set of virtual machines is known as a Web Hosting Plan. If you want to move one or more of your websites to a different set of virtual machines then you will need to create a new web hosting plan for this.

    In the new portal click on “Browse” in the left hand bar

    image

    This brings up the Browse Menu.

    image

    Select “Web hosting plans”

    image

    You can see that I only have 1 web hosting plan and it is currently hosting two websites. I would like to move them onto separate virtual machines so that I can scale them out independently.

    To do this I need to navigate to the web site I wish to move.

    image

    The top menu needs to be expanded by clicking the 3 dots on the right of the menu bar. this then displays the web hosting plan button.

    image

    Clicking this displays the web hosting plan associated with this web site

    image

    Clicking on the new hosting plan option allows you to create a new plan

    image

    I’ve selected a standard small instance to host my website.

    After clicking OK the new hosting plan will be created and the website moved to it. After a short while you should see that the hosting plan has changed in this website as well.

    image

    Note: you now have two hosting plans both of which will be a separate billing entity. I am also led to believe that if you move everything off of a hosting plan you will still be charged for it.Hosting plans can be deleted once all the websites have been moved off of it. This is done in the Web hosting plan page. right click on the plan you want to delete and select the Delete option

    Loading

    Steve Spencer's Blog | Windows Azure Queues vs Service Bus Queues

    Steve Spencer's Blog

    Blogging on Azure Stuff

    Windows Azure Queues vs Service Bus Queues

    If you have been wondering why you would use Windows Azure Queues that are part of the Storage Service or the queues that are part of the service bus then the following MSDN article will give you full details.

    http://msdn.microsoft.com/en-us/library/hh767287(VS.103).aspx

    Recent changes in pricing make the choice even harder. There are two specific areas I like that makes the service bus queue a better offering than the storage queues:

    1. Long connection timeout
    2. Topics

    The long connection timeout means that I don't have to keep polling the service bus queue for messages. I can make a connection for say 20 minutes and then when a message is added to the queue my application immediately returns the data, which you then process and then reconnect to the queue to get the next message. After 20 minutes without a message the connection closes in the same way it does when a message is received except that the message is null. You then just reconnect again for another 20 minute. The makes your application a more event driven application rather than a polling application and it should be more responsive. You can make multiple connections to the queue this way and load balance in the same way as you would when polling queues.

    The following code shows how you can connect with a long poll.

     1: NamespaceManager namespaceManager;
     2: MessagingFactory messagingFactory;
     3: Uri namespaceAddress = ServiceBusEnvironment.CreateServiceUri("sb", "yournamespace", string.Empty);
     4:  
     5: namespaceManager = new NamespaceManager(namespaceAddress, TokenProvider.CreateSharedSecretTokenProvider("yourIssuerName", "yourIssuerKey"));
     6: messagingFactory = MessagingFactory.Create(namespaceAddress, TokenProvider.CreateSharedSecretTokenProvider("yourIssuerName", "yourIssuerKey"));
     7:  
     8: WaitTimeInMinutes = 20;
     9:  
     10: // check to see if the queue exists. If not then create it
     11: if (!namespaceManager.QueueExists(queueName))
     12: {
     13:     namespaceManager.CreateQueue(queueName);
     14: }
     15:  
     16: QueueClient queueClient = messagingFactory.CreateQueueClient(queueName, ReceiveMode.PeekLock);
     17:  
     18: queueClient.BeginReceive(new TimeSpan(0, WaitTimeInMinutes, 0), this.ReceiveCompleted, messageCount);

    When a message is received or the 20 minute timeout expires then the ReceiveCompleted delegate is called and a check is made to see if the message is not null before processing it.Once processed another long poll connecting is made and the process repeats. The beauty of this method is that you don’t have to manage timers or separate threads manage the queue.

    Topics are private queues that are subscribed to by consumers and each private queue will receive a copy of the messages put into the original queue and are all manages individually. Topics can also apply filters to the message so that they only receive messages that they are interested in.

    Further details of Service bus topics and queues

    http://www.windowsazure.com/en-us/develop/net/how-to-guides/service-bus-topics/

    Loading

    Steve Spencer's Blog | Custom Application Roles in Azure AD

    Steve Spencer's Blog

    Blogging on Azure Stuff

    Custom Application Roles in Azure AD

    Previously I’ve talked about how you can control access to your web applications in Azure AD (Part 1 & Part 2) and also how to use Role Based Access Control (RBAC) to manage access to resources in Azure. This post will build on these previous posts and show you how you can create your own custom roles for use in your own web applications and how you can use these roles to control access to parts of your application.I’ll use the same example used in Part 1.

    Firstly you need to created the roles for your application to use, assign the roles to users and finally change your code to make it role aware.

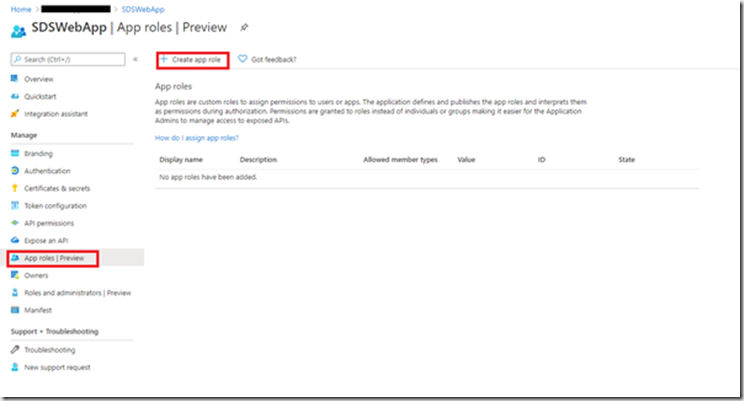
    To add roles to your application. Navigate to the Azure portal and click on Azure Active Directory and App Registrations. Select the Web App you created previously.
    image

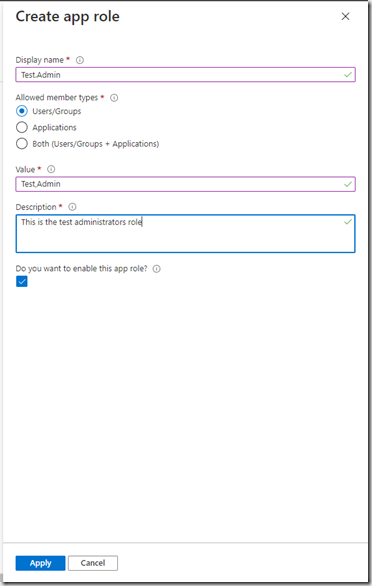
    Click on “App roles | Preview” then “Create App Role”
    image

    Enter the role information and click Apply and repeat for all the roles you require.

    You should now see your roles in the grid:

    image

    I’ve added a standard user role and a test administrator role.

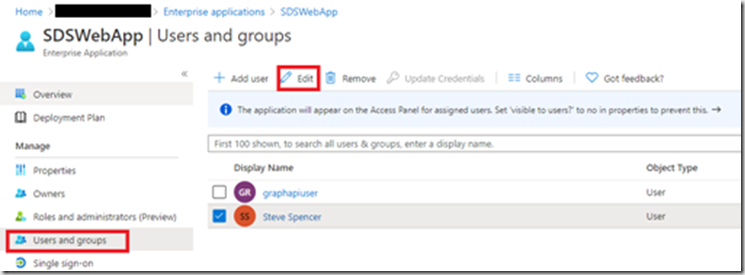
    To assign these roles to users, Navigate to the Enterprise Applications blade and click your application. Then select “Users and groups”
    image

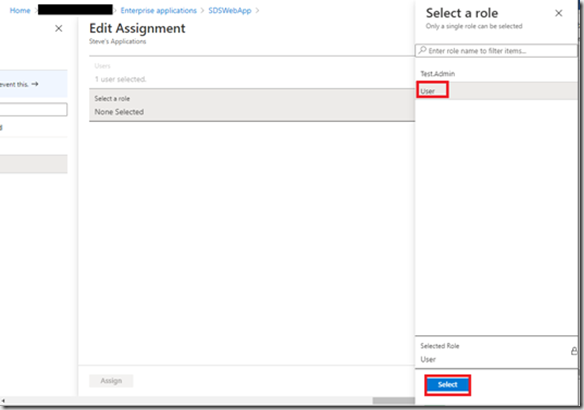
    To Add roles to an existing assigned user, tick the user and then click “Edit”
    image

    Select the role and click “Select”

    image

    You should now see the role is assigned to the user. Similarly to add a role to a new user click “Add user”

    image

    This time you need to select the new user and then the role:
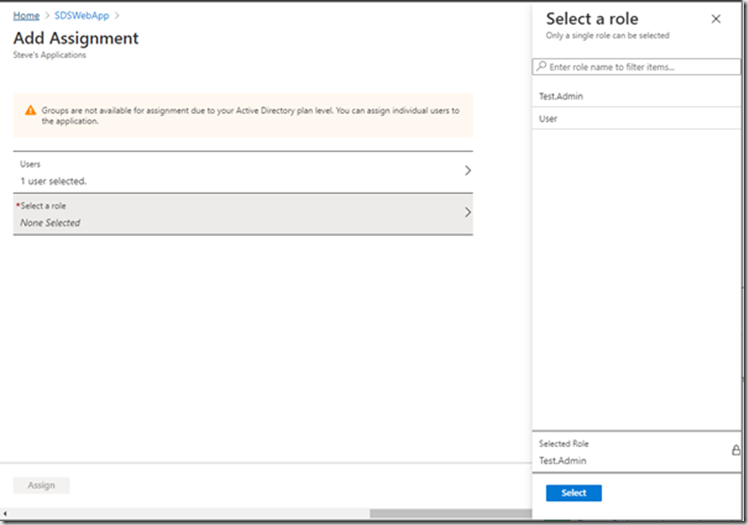
    image

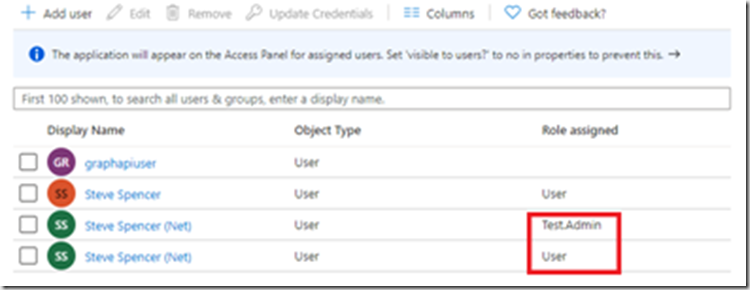
    You can add multiple roles to a user by repeating the Add user process.
    image

    Here I’ve added both new roles to one user.

    You are now ready to user these roles in your application.

    The sample code already shows how to view the claims for a user.

    image

    When I sign in to the application with the user that has two roles I see the following entries in the claims table:

    image

    Adding the roles to the application and the assigning the roles to a user is enough to make them appear as roles in your application when the user signs in. There is a limit to the number of roles that an application can have. These are stored in the manifest of the App Registration. There is a limit of 1200 items in the App Registration Manifest and this includes all the configuration items not just roles.

    There are a number of ways in which you can use Roles in code. Firstly in your views you can add conditional code to limit what a standard user can see

    @if (Request.IsAuthenticated && User.IsInRole("Test.Admin"))

    {

    <h2>You Are An Admininstrator</h2>

    <br />

    }

    When you sign in with the Test,Admin role you will get this additional text which is not visible for the User role
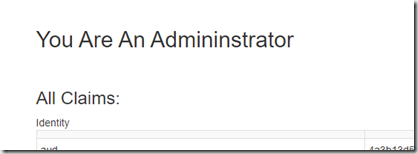
    image

    You can also control access at the controller and controller action levels by adding the Authorize attribute on the controller or controller action:

    [Authorize(Roles = "Test.Admin ")]

    public class ClaimsController : Controller

    {

    or for multiple roles

    [Authorize(Roles = "Test.Admin,User")]

    public class ClaimsController : Controller

    {

    at the action level:

    [Authorize(Roles = "Test.Admin")]

    public async Task<ActionResult> Index()

    {

    }

    or both

    [Authorize(Roles = "Test.Admin,User")]

    public class ClaimsController : Controller

    {

            [Authorize(Roles = "Test.Admin")]

            public async Task<ActionResult> Index()

            {

            }


            [Authorize(Roles = "User")]

            public async Task<ActionResult> Index2()

            {

            }

    }

    In this example the user needs either the User or Test.Admin role to access the controller but only the Test.Admin role can access the Index action and the User role can access the Index2 action. This allows you to put controls in at multiple levels and provide a more custom experience for your users.

    App Roles makes it easy to add custom roles to your application. If you have a higher Azure AD subscription you can assign these roles to groups and assign the groups to the applications. This means that you can add users to groups to assign the roles rather than adding them to each individual user. I can have a Standard user group that has the User role assigned and all users in that group will have the User role passed through to the application.

    You now have Role Based Access control in your Azure AD application and can start to build your application features out based on the roles you define.

    Loading