With any key/password store I always thought that the weak link was the credentials used to access it. If that single point of failure was compromised then all your secrets would be vulnerable. Microsoft have overcome this by creating the Managed Identity. A Managed Identity is generated by a resource within Azure and can be configured to access resources that use Azure AD for authentication. As the Managed Identity is generated by the resource there are no credentials to store anywhere and code running in the resource can use this built-in identity to access other resources. This is specifically useful for Key Vault because we can now give access to Key Vault to specific resources without the need to store any credentials anywhere. This post will show you how to access Azure Key vault from an App Service using a Managed Identity to retrieve a secret for use in accessing other services.
So I have a web site deployed to Azure App Service and in order to access Key Vault I need to create a Managed Identity for the App Service. In the Azure Portal navigate to your App Service and click on the Identity blade
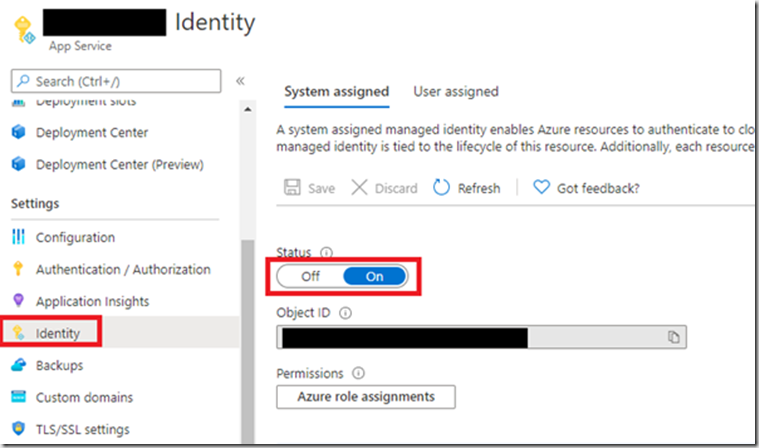
Your Manages Identity status should be Off. Click it On and then hit Save. This has now enabled your Managed Identity. The App Service Identity now exists in your associated Azure AD tenant and can be assigned to resources. This means that any code I write and deploy to this App Service will be able to take advantage of this built in identity to access the resources I need. In this example I want to access Key Vault. I therefore need to enable this new user in Key Vault. To do this I need to create a new access policy in Key Vault for this user.
Navigate to your Key Vault and click “Access policies”
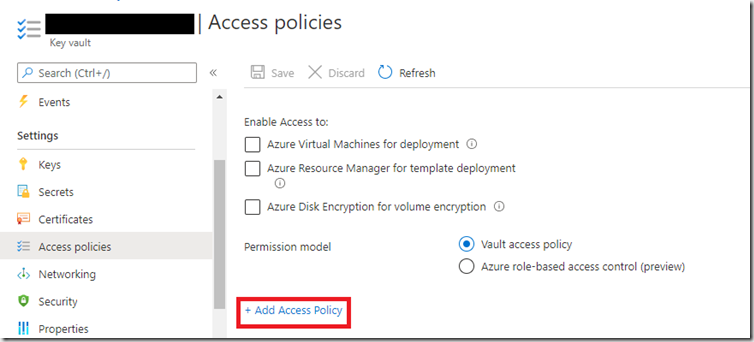
Click “Add Access policy”
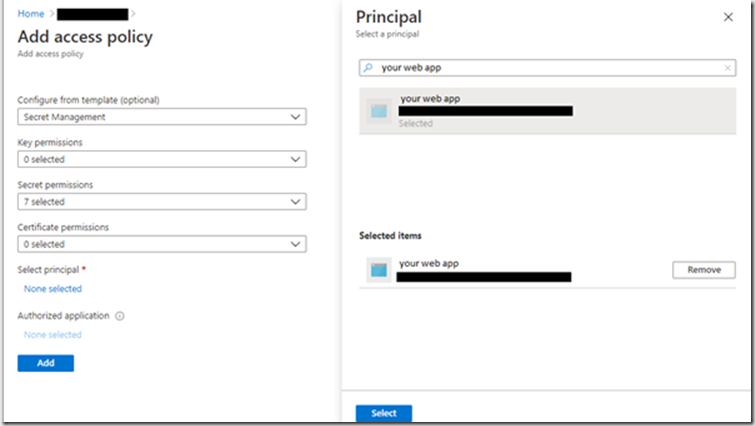
I’m interesting in just secrets from this Key Vault so I’ve selected the Secret Management template then clicked “None selected”. You should now see a new Principal blade appear. Type the name of you App service in the search box and select the principal that appears. Now click the “Select” button followed by the “Add” button. If you have not done this stage then you will get an error like this, when trying to access the Key Vault:
Service request failed. Status: 403 (Forbidden) The user, group or application 'appid=<app id>;oid=<oid>;iss=https://sts.windows.net/<tenantid>/' does not have secrets get permission on key vault 'yourkeyvault;location=westeurope'.
You should be setup now to access the secrets from code. there is a quick start guide produced by Microsoft to help with this.
Two packages are required to access Key Vault secrets.
Azure.Security.KeyVault.Secrets & Azure.Identity
With the packages installed the code to access Key Vault is simple.
var credential = new DefaultAzureCredential();
var client = new SecretClient(new Uri("https://yourkeyvault.vault.azure.net/"), credential);
var secret = await client.GetSecretAsync("YourSecret");
string actualSecret = secret.Value.Value;
Once this code is deployed to your App Service, the DefaultAzureCredential will automatically pick up the Managed Identity and allow you to access the secrets stored in it. Create a SecretClient, point it at your Key Vault and add the Managed Identity credential. Now you can retrieve the secret and use it.
Managed Identity is another tool to help you make your applications more secure. There is now a reduced risk of compromise from a mishandled Key Vault credential that you’ve stored somewhere safe. The Managed Identity cannot be used from anywhere other than code running in your App Service.