Steve Spencer's Blog

Blogging on Azure Stuff

Copying and unzipping files using Kudu on Azure App Service

Kudu is a useful tool that is part of your Azure App Service. I posted a video showing how you can access the Debug Console of Kudu and edit files. In this post I’ll show how you can upload files to your website and also how you can unzip files.

Starting with an empty site, navigate to the Kudu console via the Azure Portal App Service Advanced tools then Debug Console –> CMD

image

To upload a file drag one from Windows Explorer and drop it on the left hand side

image

After uploading the file should appear in the list

image

If you want to delete the file click the circle icon of the file you want to delete:

image

To upload a file and also unzip it there are two options. You can upload the file using the method above by dragging the file in. Then in the command window run the unzip command.

image

Alternatively you can drag the zip file onto the right hand side of the screen.

image

This will upload the file and unzip it in one action.

So with my previous video and this post I’ve shown you how to upload, unzip edit and delete files in your Azure App service. Kudu has helped me to access the files, make changes and debug in scenarios where I don’t have access to my normal tools and I hope you find it useful too.

Custom Application Roles in Azure AD

Previously I’ve talked about how you can control access to your web applications in Azure AD (Part 1 & Part 2) and also how to use Role Based Access Control (RBAC) to manage access to resources in Azure. This post will build on these previous posts and show you how you can create your own custom roles for use in your own web applications and how you can use these roles to control access to parts of your application.I’ll use the same example used in Part 1.

Firstly you need to created the roles for your application to use, assign the roles to users and finally change your code to make it role aware.

To add roles to your application. Navigate to the Azure portal and click on Azure Active Directory and App Registrations. Select the Web App you created previously.
image

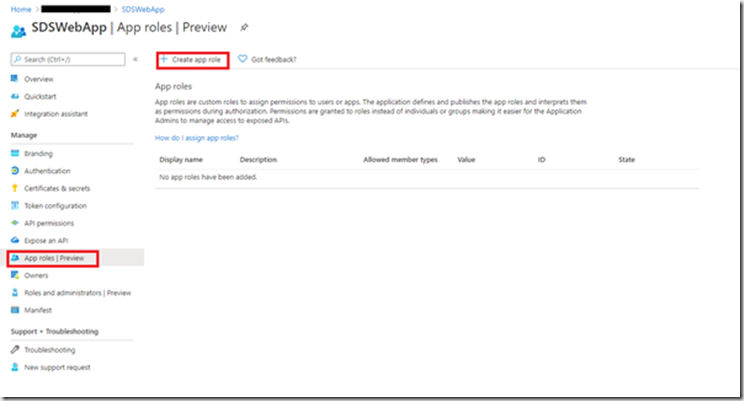
Click on “App roles | Preview” then “Create App Role”
image

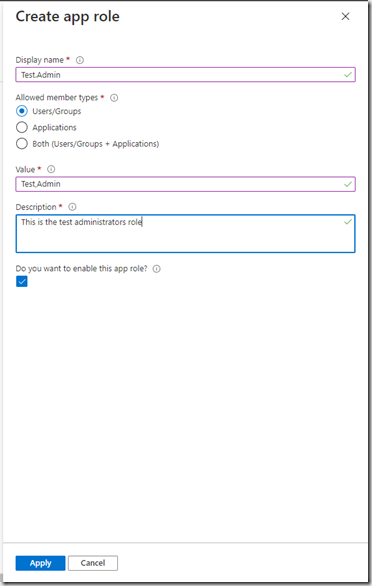
Enter the role information and click Apply and repeat for all the roles you require.

You should now see your roles in the grid:

image

I’ve added a standard user role and a test administrator role.

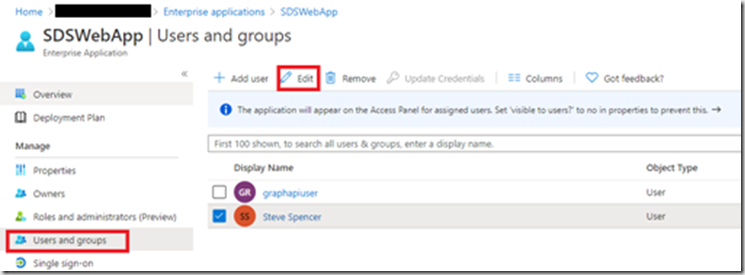
To assign these roles to users, Navigate to the Enterprise Applications blade and click your application. Then select “Users and groups”
image

To Add roles to an existing assigned user, tick the user and then click “Edit”
image

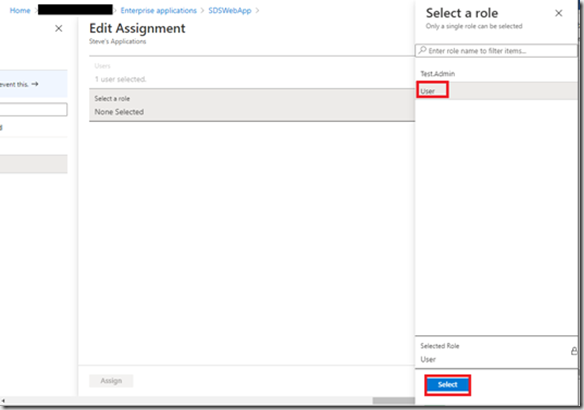
Select the role and click “Select”

image

You should now see the role is assigned to the user. Similarly to add a role to a new user click “Add user”

image

This time you need to select the new user and then the role:
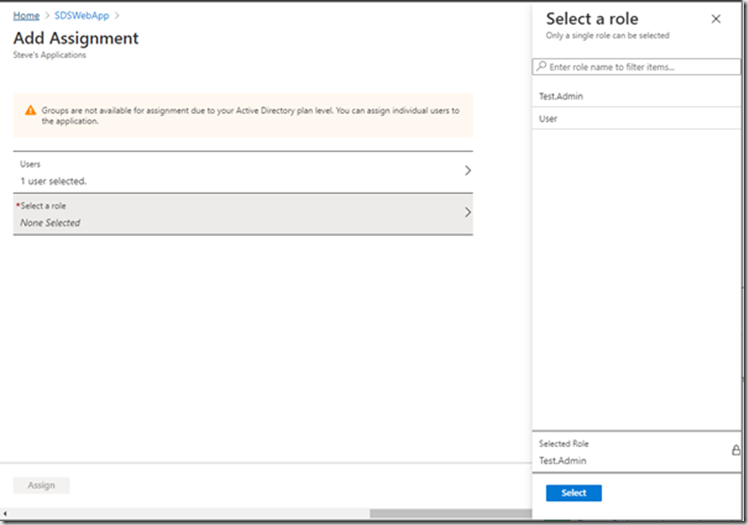
image

You can add multiple roles to a user by repeating the Add user process.
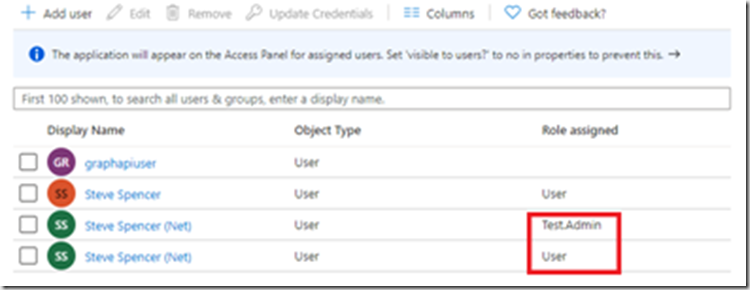
image

Here I’ve added both new roles to one user.

You are now ready to user these roles in your application.

The sample code already shows how to view the claims for a user.

image

When I sign in to the application with the user that has two roles I see the following entries in the claims table:

image

Adding the roles to the application and the assigning the roles to a user is enough to make them appear as roles in your application when the user signs in. There is a limit to the number of roles that an application can have. These are stored in the manifest of the App Registration. There is a limit of 1200 items in the App Registration Manifest and this includes all the configuration items not just roles.

There are a number of ways in which you can use Roles in code. Firstly in your views you can add conditional code to limit what a standard user can see

@if (Request.IsAuthenticated && User.IsInRole("Test.Admin"))

{

<h2>You Are An Admininstrator</h2>

<br />

}

When you sign in with the Test,Admin role you will get this additional text which is not visible for the User role
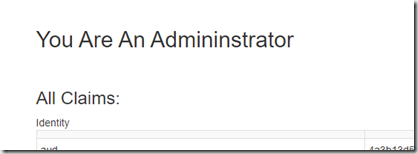
image

You can also control access at the controller and controller action levels by adding the Authorize attribute on the controller or controller action:

[Authorize(Roles = "Test.Admin ")]

public class ClaimsController : Controller

{

or for multiple roles

[Authorize(Roles = "Test.Admin,User")]

public class ClaimsController : Controller

{

at the action level:

[Authorize(Roles = "Test.Admin")]

public async Task<ActionResult> Index()

{

}

or both

[Authorize(Roles = "Test.Admin,User")]

public class ClaimsController : Controller

{

        [Authorize(Roles = "Test.Admin")]

        public async Task<ActionResult> Index()

        {

        }


        [Authorize(Roles = "User")]

        public async Task<ActionResult> Index2()

        {

        }

}

In this example the user needs either the User or Test.Admin role to access the controller but only the Test.Admin role can access the Index action and the User role can access the Index2 action. This allows you to put controls in at multiple levels and provide a more custom experience for your users.

App Roles makes it easy to add custom roles to your application. If you have a higher Azure AD subscription you can assign these roles to groups and assign the groups to the applications. This means that you can add users to groups to assign the roles rather than adding them to each individual user. I can have a Standard user group that has the User role assigned and all users in that group will have the User role passed through to the application.

You now have Role Based Access control in your Azure AD application and can start to build your application features out based on the roles you define.

Accessing secrets in Azure Key Vault using a Managed Identity

With any key/password store I always thought that the weak link was the credentials used to access it. If that single point of failure was compromised then all your secrets would be vulnerable. Microsoft have overcome this by creating the Managed Identity. A Managed Identity is generated by a resource within Azure and can be configured to access resources that use Azure AD for authentication. As the Managed Identity is generated by the resource there are no credentials to store anywhere and code running in the resource can use this built-in identity to access other resources. This is specifically useful for Key Vault because we can now give access to Key Vault to specific resources without the need to store any credentials anywhere. This post will show you how to access Azure Key vault from an App Service using a Managed Identity to retrieve a secret for use in accessing other services.

So I have a web site deployed to Azure App Service and in order to access Key Vault I need to create a Managed Identity for the App Service. In the Azure Portal navigate to your App Service and click on the Identity blade

image

Your Manages Identity status should be Off. Click it On and then hit Save. This has now enabled your Managed Identity. The App Service Identity now exists in your associated Azure AD tenant and can be assigned to resources. This means that any code I write and deploy to this App Service will be able to take advantage of this built in identity to access the resources I need. In this example I want to access Key Vault. I therefore need to enable this new user in Key Vault. To do this I need to create a new access policy in Key Vault for this user.

Navigate to your Key Vault and click “Access policies”

image

Click “Add Access policy”

image

I’m interesting in just secrets from this Key Vault so I’ve selected the Secret Management template then clicked “None selected”. You should now see a new Principal blade appear. Type the name of you App service in the search box and select the principal that appears. Now click the “Select” button followed by the “Add” button. If you have not done this stage then you will get an error like this, when trying to access the Key Vault:

Service request failed. Status: 403 (Forbidden) The user, group or application 'appid=<app id>;oid=<oid>;iss=https://sts.windows.net/<tenantid>/' does not have secrets get permission on key vault 'yourkeyvault;location=westeurope'.

You should be setup now to access the secrets from code. there is a quick start guide produced by Microsoft to help with this.

Two packages are required to access Key Vault secrets.

Azure.Security.KeyVault.Secrets & Azure.Identity

With the packages installed the code to access Key Vault is simple.

var credential = new DefaultAzureCredential();
var client = new SecretClient(new Uri("https://yourkeyvault.vault.azure.net/"), credential);
var secret = await client.GetSecretAsync("YourSecret");
string actualSecret = secret.Value.Value;

Once this code is deployed to your App Service, the DefaultAzureCredential will automatically pick up the Managed Identity and allow you to access the secrets stored in it. Create a SecretClient, point it at your Key Vault and add the Managed Identity credential. Now you can retrieve the secret and use it.

Managed Identity is another tool to help you make your applications more secure. There is now a reduced risk of compromise from a mishandled Key Vault credential that you’ve stored somewhere safe. The Managed Identity cannot be used from anywhere other than code running in your App Service.

Testing connectivity to your backend service with Hybrid Connection in App Service

I have a backend service that is connected to my web site which is hosted in Azure App Service using a Hybrid Connection. When setting up a Hybrid Connection it is useful to be able to test connectivity to your backend service. I’ve previously posted a video to show you to access the Kudu control panel so that you can look at the files in the hosted site. We’ll use the Kudu control panel to also test connectivity, only this time we’ll use the PowerShell debug console.

In Azure Portal click on your app service and go to Advanced Tools and select Go

image

This will open the Kudu console in a new tab.

Click on Debug console the PowerShell

image

This opens the debug console in PowerShell and allows your to run PowerShell commands on the App Service. As you are running on the App Service you will have access to the backend service that is connected via the web service.

image

My service has a Get endpoint that I can call to test connectivity. There are a number of commands we could run but I’ll use Invoke-WebRequest.

For this I am using www.bing.com but you use the url of your backend service that you have configured in your Hybrid Connection.

Invoke-WebRequest -Uri http://www.bing.com

image

This returns the following error

The response content cannot be parsed because the Internet Explorer engine is not available, or Internet Explorer's first-launch configuration is not complete. Specify the UseBasicParsing parameter and try again.

The error says what you need to do. Add UseBasicParsing to the command

Invoke-WebRequest -Uri http://www.bing.com –UseBasicParsing

image

We now get the error:

Win32 internal error "The handle is invalid" 0x6 occurred while reading the console output buffer

To fix this we need to tell PowerShell to silently continue by issuing the following command:

$progressPreference = "silentlyContinue"

Then call your web request

image

I’ve now got the output from the web request with a status code of 200 showing I’ve got connectivity.

Introduction to Azure Role Based Access Control (RBAC)

Up until fairly recently I have been managing  access to a number of Azure subscriptions but as I’ve been working for smaller organisations the number of people who needed access was fairly small and easy to manage. It also meant that I generally gave the users Owner or Contributor access to the subscriptions as we were all managing everything so we needed the access at that level. Now I work for a large organisation there is a greater need to  limit access to certain areas of Azure and giving subscription wide access is limited to a few key administrators. This means that I need to look at the minimum access that is required for each of the users who need access to the resources. First I’d like to talk about the scope within which permissions can be set within Azure. For most of the scenarios I’ve worked in I have visibility of a single subscription. For organisations  with a large number of subscriptions there is a further level of scope, Management group, which I won’t be discussing.

image

Permissions can be set at the Subscription, Resource group or the individual resource scope.Depending upon the level of access your user requires there are three basic levels which you can use

  • Owner
  • Contributor
  • Reader

Owner gives the user full access to everything within the scope and can also assign roles to other users.

Contributor gives the user full access to everything within the scope except they are not able to assign roles to other users

Reader give the user access to view the resources within the scope but they are not able to change anything or assign roles.

So assigning the user the Owner role at the Subscription level, then the user can manage all resources within the subscription and assign roles to users. A user can be assigned multiple roles and Azure RBAC is additive so if a user was assigned Contributor at the subscription scope but only Reader on one of the resource groups, the Contributor role would override the reader role. It is also possible to have Deny role assignments. Where a user is Denied permissions on a specific role. Deny assignments take precedence over role assignments.

These roles plus the variety of scopes give some flexibility of access but it is still a large surface area of access that is provided. Azure offers a large number of finer grained roles to allow users to be given specific permissions to specific services. There are a large number of built in assignments as can be seen here: https://docs.microsoft.com/en-us/azure/role-based-access-control/built-in-roles

These finer grained roles allow you to set specific permissions on a specific user within a specific scope. For example if  you wanted to give a user access to a blob store to upload files via the Azure portal there are two permissions that can be set: Reader and Data Access and

Storage Blob Data Contributor. If you assign these two roles to a user in the storage account, then the user is able to login to the Azure portal and navigate to the storage account and access the blob store.

To do this, navigate to the storage account within which you want to assign a role and click the access control item

image

The click “Add role assignment”

image

In the role drop down pick “Storage Blob Data Contributor”, select the user you want to assign the role to and click save. Repeat this for the Reader and Data Access role. Your user now has access only to blob storage and has no access elsewhere in the resource group or subscription. I could have done the same thing by selecting the resource group and Access control and adding these roles there. This would have give the user access to all blob stores within the resource group.

Another example is that you may want to give someone access to your app service so that they can configure and deploy. So navigate to your App Service and click “Access control”, then select the role “Website Contributor”. See https://docs.microsoft.com/en-us/azure/role-based-access-control/built-in-roles#website-contributor for more details. This lets you manage the selected website but not app service plans and no other web sites. If you want to manage other app services then you could add the same role at the resource group level.

Managing Application Access with Azure AD – Part 1

In my next series of blog post I want to talk about how to manage access to applications using Azure AD.

I’ve been looking at how I can set up access to my web based applications and I want to be able to:

  1. Have a single sign on with multiple applications
  2. Allow some users access to only some of the applications
  3. Be able to give access to users outside of my organisation
  4. Be able to control access via code

Part 1 will cover setting my applications up and then restricting access to the applications via Azure AD.

In order to test this I needed to have a number of applications that I could use. I used this example:

https://github.com/AzureADQuickStarts/AppModelv2-WebApp-OpenIDConnect-DotNet

It allows me to login and see my claims. I deployed this into two different app services so I could navigate to them separately. I’m not going to talk about the code on the web side apart from the bits you need to configure up the sample. This series of blogs are more about how to setup Azure AD and the path I went through to my end goal of configuring up users programmatically.

In order to integrate with Azure AD we need to set up each of the applications. This will provide us with an ID with which we can  use to configure each of the applications.

In Azure Portal navigate to Azure Active Directory, or search for it in the search bar

C portal-azure.com/#home 
Microsoft Azure 
p Search resources, services, and docs (G./) 
Azure services 
Create a 
resource 
Azure Active 
Directory 
SQL databases 
Azure AD 
Privileged. 
App 
registrations    C portal-azure.com/#home 
p activd 
Microsoft Azure 
Services 
Azure s 
Azure AD Privileged Identity Management 
-+ Activity log 
Azure Active Directory 
reso HDlnsight clusters 
e Monitor

Home > Default Directory I Overview 
O Default Directory I Overviev 
Azure Active Directory 
p Search (Ctrl 4/) 
O Overview 
Getting started 
Diagnose and solve problems 
Manage 
users 
Organizational relationships 
Roles and administrators 
Enterprise applications 
Devices 
App registrations 
Identity Governance    Home > Default Directory App registrations 
Default Directory I App registrations 
Active 
Search (Ctrl *

In the menu bar on the left select App Registrations –> New registration and complete the form:

Home ) Default Directory App registrations ) Register an application 
Register an application 
-k Name 
The user-facing display name for this application (this can be changed later). 
My New app 
Supported account types 
Who can use this application or access this API? 
@ Accounts in this organizational directory only (Default Directory only - Single tenant) 
O Accounts in any organizational directory (Any Azure AD directory - Multitenant) 
O Accounts in any organizational directory (Any Azure AD directory - Multitenant) and personal Microsoft accounts (e.g. Skype, Xbox) 
Help me choose... 
Redirect URI (optional) 
We'll return the authentication response to this URI after successfully authenticating the user. Providing this now is optional and it can be 
changed later, but a value is required for most authentication scenarios. 
web 
v http /mynewapp.azurewebsites.net 
gy proceeding, you agree to the Microsoft Platform Policies 
Register

I've picked single tenant as I want to invite users using B2B. Now click Register

You need to copy the ID's needed for your web app:

Delete Endpoints 
O 
Got a second? We would love your feedback on Microsoft identity platform (previously Azure AD for developer). * 
Display name 
Application (client) ID 
Directory (tenant) ID 
Object ID 
My New app 
Supported account types 
: My organization only 
Redirect URIS 
: I web, O public client 
Application ID URI 
: Add an Application ID URI 
Managed application in My New app

Copy the Client ID and Tenant ID. Repeat this process for the next app. I've created two apps as I wanted to test limiting access to a single app and deny access to the second if the users has not been invited to it or added manually.

Now add these to the web.config in the sample app. There will be two settings for ClientId and Tenant. Make sure that the redirect url matches the url of the application you registered and redeploy. Repeat this for the second application.

If you navigate to the web apps and try and login, you may get an error as we haven't setup any users, although any users currently in your Azure AD should be able to login.

To give users access to your app. Go back to Azure Active Directory and this time select Enterprise Applications and click on the app you just created.

Home 
) Default Directory > Enterprise applications All applications > My New app I Overview 
My New app I Overview 
Enterp•ise Application 
rvlew 
Diagnose and solve problems 
Manage 
Properties 
Owners 
Users and groups 
Provlston•ng 
Application proxy 
Splf_+ruire 
Properties 
O 
Name 
MN 
My New app 
Application ID 
Object ID Q) 
Getting Started

Click Users and groups

My New app I Users and groups 
Enterprse Applicat& 
+ Add user 
Edit Remove p Update Credentials 
Overview 
O 
The application will appear on the Access Panel for assigned users. 
Diagnose and solve problems 
irst 100 shown, to search all users & groups, enter a display nami 
Manage 
Display Name 
Properties 
NO application assignments found 
Owners 
Users and groups 
provisioning

Click Add user

Home > Default Directory > Enterprise applications I All applications > My New app Users and groups > Add Assignment 
Add Assignment 
Default 
Groups are not available for assignment due to your Active Directory plan level. 
Users 
None Selected 
Select Role 
Default Access

Click None Selected, pick users from the list and click Select. These users have now been given access to your application. However, as I mentioned earlier all users who are part of your Azure AD currently are able to login to your web app, we need to now configure the app so that only assigned users can access it.

Click Properties in your enterprise application and set User Assignment required to yes and click Save. (repeat this for your other application)

Home Default Directory 
My New app I 
Enterprise Applicati'H 
Overview 
> Enterprise applications I All applications > My New app I Properties 
Properties 
Save Discard Delete 
Enabled for users to sign-in? O 
Diagnose and solve problems 
Manage 
properties 
Owners 
Users and groups 
provisioning 
Application proxy 
Self-service 
Security 
Conditional Access 
permissions 
Token encryption 
Name * (D 
Homepage URL G) 
Logo @ 
Application ID O 
Object ID O 
User assignment required? C) 
Visible to users? O 
My New app 
MN 
Select a file

Now only users who are assigned to your application can login. You can test this now. Go to the first application url and login with one of the users you assigned. Then go to the second app (you shouldn't have assigned any users just yet.) and login. This time you will get an error.

You can now assign users to the second application and the error should go away when you attempt to login.

We’ve now set up our applications in Azure AD and limited access to each application. In my next post I’ll show you how you can then add users from outside of your organisation to these applications.

Using Azure DevOps to Restart a Web App

Recently I had an issue with one of the web sites I was supporting and it seemed to be falling over each night and it was difficult to work out what was wrong. Whilst I was working it out I need a mechanism to restart the website over night so that I could then take the time to figure out exactly what was wrong. There were a number of ways to achieve this but the simplest one for me was to use an Azure DevOps Release pipeline triggered on a schedule. The Azure DevOps “Azure App Service Manage” task allows me to achieve this.

image

To get started create a new release pipeline with an Empty job

image

Click on the “1 job, 0 task” link and then click on the “+” in Agent Job.

image

Enter “App service” in the search box and select “Azure App Service Manage” from the list of tasks that appear and click “Add”.

image

The task will default to Swap Slots but you can change this. Select your Azure Subscription and click “Authorize” if you haven’t already authorised your Azure Subscription.

image

Clicking “Authorize” will take you through the sign in process where you will need to enter your username and password for the Azure subscription that contains your app service. Once authorised select the Action you want to perform. Currently the list contains:

image

Select “Restart App Service” then pick your app service from the “App Service name” list, Also change the display name as it defaults to “Swap Slots:”

image

Your pipeline is now configured to restart your app service.

image

You now need to trigger this. Click on the pipeline tab

image

Then click on the Schedule button

image

Enable the trigger and select your desired schedule, edit the release pipelines title and click save. Your web site will now restart based upon the schedule you picked.

You can restart multiple web apps with a single release pipeline

image

You are able to chain each website or do it in parallel by changing the pre-deployment conditions:

image

To chain them select “after stage” and in parallel select “after release” for each stage.

When the schedule is run a new release is created and the web apps will restart and you will be able to see the status of each attempt in the same way you do with your standard releases.

Creating a Scheduled Web Job in Azure

It’s been a while since I’ve talked about web jobs, but they are still around.I needed to modify one of mine recently and configure it as a scheduled web job.

You can deploy your web job from the Azure Portal. Web jobs are part of App Services and are deployed by selecting your app service you want and clicking the web jobs service.

image

Click the Add button.

image

Enter a name for your web job, Browse a zip or exe containing your web job

Select Triggered from the Type drop down. This change the UI to allow you to select Scheduled

image

The Schedule is triggered using a CRON expression.

Alternatively, configure the web job as a manual trigger, then use the Azure Scheduler to trigger the web job.. When you have configured your web job, click on its properties in the Azure Portal and you should see a web hook url.

https://yourwebapp.scm.azurewebsites.net/api/triggeredwebjobs/yourwebjob/run

Now create a new scheduler Job

image

Select the method as Post and paste in the webhook url.Once you've completed this configuration you can then configure the schedule

image

Using the scheduler allows you to configure retry policies and also error actions

Azure Relay Hybrid Connections

If you are using the Azure App Service to host your web site and you want to connect to an on-premises server then there a number of ways you can do this. One of the simplest is to use the hybrid connection. Hybrid connections have had a bit of a revamp lately and they used to require a BizTalk service to be created, now you just need a Service Bus Relay. You can generally use the hybrid connection to communicate to your back end server over TCP and you will need to install an agent on your server (or a server that  can reach the one you want to connect to) called the Hybrid Connection Manager (HCM). HCM will make an outbound connection to the Service Bus Relay over ports 80 and 443, so you are unlikely to need firewall ports changing.

Hybrid connections are limited to a specific server name and port and your code in the Azure App Service will address the service as if it was in your local network, but will only be able to connect to the machine and port configured in the Hybrid Connection. Instructions for configuring your hybrid connection and HCM are here.

I have setup a number of the old BizTalk style hybrid connections and the new way is a lot easier to do. I ran into a few connectivity issues when I first created the Relay hybrid connection and there were a few things I found that helped me to find out where the issues were. Firstly the link I provided to configure the hybrid connection has a troubleshooting section which talks about tcpping. You can run this in the debug console in Azure and it will check to see if your HCM is talking to the same relay as the one in your app service. To get to the debug console, log in to your azure portal, select the app service you want to diagnose. Scroll down to Advanced Tools and click Go.

image

This will take you to your Kudu dashboard where you can do a lot of nice things, such as process explorer, diagnostic dumps, log streaming and debug console

The address will be https://[your namespace].scm.azurewebsites.net/

The debug console will allow you to browse and edit files directly in your application without the need to ftp. This is really useful when trying to check configuration issues.

If you want to check connectivity from your server machine to the Azure Relay then you can use telnet. You might need to add the telnet feature to Windows by using:

dism /online /Enable-Feature /FeatureName:TelnetClient (From https://www.rootusers.com/how-to-enable-the-telnet-client-in-windows-10/)

in a command prompt type

telnet [your relay namespace].servicebus.windows.net 80 or

telnet [your relay namespace].servicebus.windows.net 443

Then a blank screen denotes successful connectivity (from: https://social.technet.microsoft.com/wiki/contents/articles/2055.troubleshooting-connectivity-issues-in-the-azure-appfabric-service-bus.aspx)

You can also use PowerShell to check:

Test-Netconnection -ComputerName [your relay namespace].servicebus.windows.net -Port 443

This all checks that you are connected to the relay, the final thing you need to check is whether you can actually resolve the dns of the target service from the server where HCM is running. This needs to be the host name of the server and not the fully qualified name. This also needs to match the machine name you configured in the hybrid connection.The easiest way to do this for me was to put the address of WCF service I wanted to connect to into a browser on the machine running HCM.

Hopefully I’ve given you a few pointers to help identify why your hybrid connection does not connect.