Steve Spencer's Blog

Blogging on Azure Stuff

Exporting Logs from Application Insights using Continuous Export

This is the fifth post of my series of posts about Log Analytics and Application Insights. The previous post talked about adding custom logging to you code using Application Insights. Now you’ve got your logging into Application Insights you can run log analytics queries and build dash boards, alerts etc. Sometime though you want to use this data in other systems and it would be useful if you could export the data and use it else where. This post will show you how you can regularly export the data from Application Insights into Azure Storage. Once it is in Storage it can easily be moved into other systems or used else where such as PowerBI. This can be achieved using the Continuous Export feature of Application Insights

To enable Continuous Export, login to the Azure management portal and navigate to Application Insights. Click on the instance you want Continuous Export enabled. The scroll down the options on the left until you find the Configure section and click on Continuous Export

image

To use Continuous Export you will need to configure a storage account. Click Add:

image

Click Data types to export:

image

I was only interested in the logs I emitted from my custom logging, so selected Custom Event, Exception and Trace then clicked OK

image

Next pick a storage location. Make sure you use one where your Application Insights instance is located otherwise you will be charged egress fees to move the data to a new datacentre.

image

You can now pick an existing storage account or create a new one. Upon selecting a storage account you can pick an existing  container or create a new one.Once a blob container is selected click OK.

Continuous Export is now configured. You will not see anything in the storage container until the next set of logs are sent to Application Insights.

My log analytics query shows the following logs have been generated:

image

If you look at the continuous Export configuration page you will see that the last updated date has changed.

image

Now look in blob storage. You should see a folder that is<ApplicationInsights_ServiceName>_<ApplicationInsights_InstrumentationKey

image

Click through and you will see a number of folders. One for each of the logs that I enabled when setting up Continuous Export. Click through one of them and you will see a folder for the date and then a folder for the hour of the logs. Then a file containing the logs for that hour.

image

You will get a row of json data for each row output for the log query. Note the whole logs emitted will be in each of the folders.

e.g.

{
     "event": [
         {
             "name": "Some Important Work Completed",
             "count": 1
         }
     ],
     "internal": {
         "data": {
             "id": "a guid is here",
             "documentVersion": "1.61"
         }
     },
     "context": {
         "data": {
             "eventTime": "2020-03-22T18:12:30.2553417Z",
             "isSynthetic": false,
             "samplingRate": 100.0
         },
         "cloud": {},
         "device": {
             "type": "PC",
             "roleInstance": "yourcomputer",
             "screenResolution": {}
         },
         "session": {
             "isFirst": false
         },
         "operation": {},
         "location": {
             "clientip": "0.0.0.0",
             "continent": "Europe",
             "country": "United Kingdom",
             "province": "Nottinghamshire",
             "city": "Nottingham"
         },
         "custom": {
             "dimensions": [
                 {
                     "CustomerID": "4df16004-2f1b-48c0-87d3-c1251a5db3f6"
                 },
                 {
                     "OrderID": "5440d1cf-5d06-4b0e-bffb-fad522af4ad1"
                 },
                 {
                     "InvoiceID": "a7d5a8fb-2a2e-4697-8ab4-f7bf8b8dbe18"
                 }
             ]
         }
     }
}

As the data is now out of Application Insights you can move it where ever you need it. You will also need to manage the blob storage data too otherwise you will end up with the logs stored in two places and the storage costs will be doubled.

One example of subsequent usage is exporting the data to Event Hub. As the data is in blob storage you can use a function with a blob trigger to read the blob in a row at a time and publish the data onto Event Hub:

[FunctionName("ContinuousExport")]
public static async void Run([BlobTrigger("logs/{name}", Connection = "ConitnuousExportBlobSetting")]Stream myBlob, string name,
     [EventHub("logging", Connection = "EventHubConnectionAppSetting")] IAsyncCollector<string> outputEvents,TraceWriter log)
{
     log.Info($"C# Blob trigger function Processed blob\n Name:{name} \n Size: {myBlob.Length} Bytes");
     StreamReader textReader = new StreamReader(myBlob);
     while (!textReader.EndOfStream)
     {
         string line = textReader.ReadLine();
         log.Info(line);
         await outputEvents.AddAsync(line);
     }
}

Note: This is an example, so will need additional code to make sure that you don’t exceed the Event Hub maximum message size

So with Continuous Export you can extract your log data from Application insights and move it to other systems for processing.

Processing data from IoT Hub in Azure Functions

If you have been following my previous posts (Part 1, part 2, part 3) you will know that I’m using an ESP 8266 to send data to the Azure IoT hub. This post will show you how to receive that data and store it in Azure Storage and also show how you can also forward the data onto the Azure Service Bus.

I’m going to use Visual Studio and C# to write my function. If you are unfamiliar with Azure functions you can setup bindings to a variety of Azure resources. These bindings make it easy to interface without needing to write a lot of boiler plate code. These bindings allow your function to be triggered when something happens on the resource or also use the output bindings to write data to these resources. For example, there are bindings for Blob and Table storage, Service bus, Timers etc. We’re interested in the IoT hub binding. The IoT hub trigger will be fired when an event is sent to the underlying Event hub. You can also use an output binding to put messages into the IoT hub event stream. We’re going to use the Table storage and Service bus output bindings.

To get started you need to create a new Function project in Visual Studio.
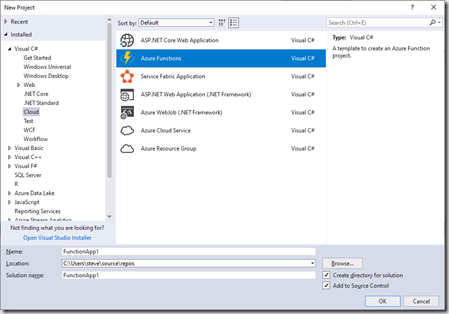
image

Select IoT hub trigger and browse to a storage account you wish to use (for logging) plus add in the setting name you want to use to store the IoT hub connection string.
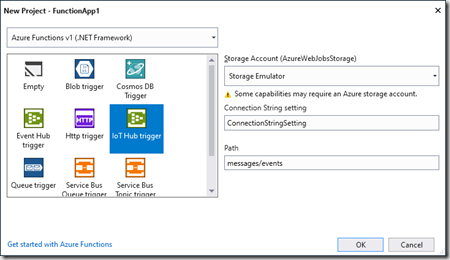
image

This will generate your empty function with you preconfigured IoT hub trigger.

You need to add your IoT hub connection string to your setting file. Open local.settings.json and add in a new line below the AzureWebjobs settings with the same name you entered in the dialog. ConnectionStringSetting in my example.Your connection string can be found in the Azure Portal.

Navigate to your IoT hub, then click Shared Access Policies
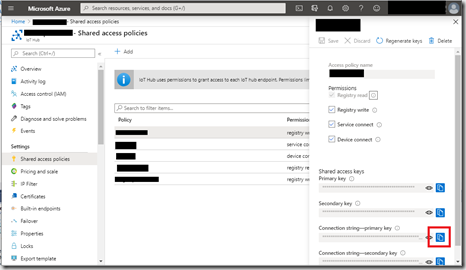
image

Select the user you want to use to access the IoT hub and click the copy icon next to the primary key connection string.

image

You can run this in the Visual Studio debugger and when messages are sent to your IoT hub you should see a log appearing in the output window.

What I want to do is to receive the temperature and humidity readings from my ESP 8266 and store the data in Azure storage so that we can process it later.

For that I need to use the Table storage output binding. Add the binding attribute to your function below the FunctionName binding.

[return: Table("MyTable", Connection = "StorageConnectionAppSetting")]

Again, you will need to add the storage setting into your config file. Find your storage account in the Azure portal, click Access keys then copy the key1 connection string and paste it in your config file
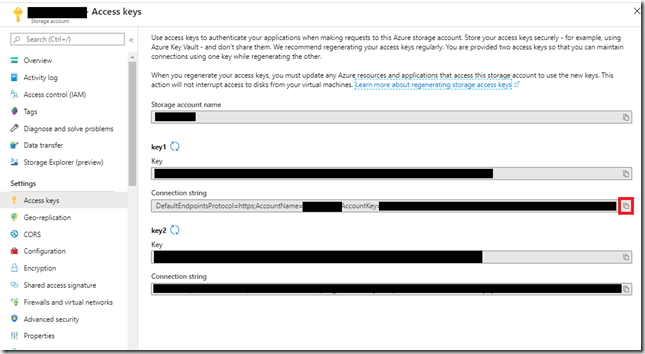
image

To use Azure Storage Output binding you will need to create a class that represents the columns in you table.
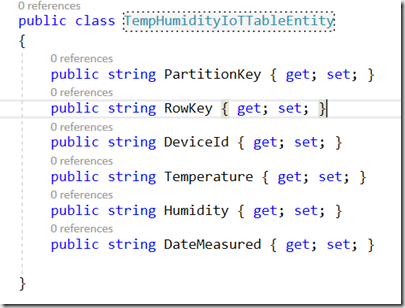
image

I included a device id so that I can identify which device the reading we associated to. You will need to change the return type of your function to be TempHumidityIoTTableEntity then add the code to extract the data from the message.

Firstly, I changed the python code in my ESP8266 to send the data as json so we can process it easier. I’ve also added a message identifier so that we can send different messages from the ESP8266 and be able to process them differently.

sensor.measure()

dataDict = {'partitionKey': 'r',

      'rowkey':'recneptiot'+str(utime.ticks_ms()),

      'message':'temphumidity',

      'temperature':str(sensor.temperature()),

      'humidity': str(sensor.humidity())}

mqtt.publish(sendTopic,ujson.dumps(dataDict),True)

That means we can serialise the Iot Hub message into something we can easily access. So the whole function is below:

[FunctionName("Function1")]
[return: Table("yourtablename", Connection = "StorageConnectionAppSetting")]
public static TempHumidityIoTTableEntity Run([IoTHubTrigger("messages/events", Connection = "ConnectionStringSetting")]EventData message, TraceWriter log)
{
     var messageAsJson = Encoding.UTF8.GetString(message.GetBytes());
     log.Info($"C# IoT Hub trigger function processed a message: {messageAsJson}");

    var data = JsonConvert.DeserializeObject<Dictionary<string, string>>(messageAsJson);

    var deviceid = message.SystemProperties["iothub-connection-device-id"];

    return new TempHumidityIoTTableEntity
     {
         PartitionKey = deviceid.ToString(),
         RowKey = $"{deviceid}{message.EnqueuedTimeUtc.Ticks}",
         DeviceId = deviceid.ToString(),
         Humidity = data.ContainsKey("humidity") ? data["humidity"] : "",
         Temperature = data.ContainsKey("temperature") ? data["temperature"] : "",
         DateMeasured = message.EnqueuedTimeUtc.ToString("O")
     };

}

Providing your config is correct you should be able to run this in the Visual Studio debugger and view your data in Table Storage:

image

I mentioned at the start that I wanted to pass some messages onto the Azure Service bus. For example we may want to do something if the humidity goes above 60 percent. In this example we could add a HighHumidity message to service bus for some other service or function to respond to. We’ll send the message as a json string so that we can action it later in a different service. You can easily add a Service Bus output binding to your function. However, this binding documentation shows it as another return value. There is an alternative binging that allows you to set a message string out parameter with the message contents. This can be used as follows:

    [FunctionName("Function1")]
     [return: Table("yourtablename", Connection = "StorageConnectionAppSetting")]
     public static TempHumidityIoTTableEntity Run([IoTHubTrigger("messages/events", Connection = "ConnectionStringSetting")]EventData message,
         [ServiceBus("yourQueueOrTopicName", Connection = "ServiceBusConnectionSetting", EntityType = EntityType.Topic)]out string queueMessage,
         TraceWriter log)
     {
         var messageAsJson = Encoding.UTF8.GetString(message.GetBytes());
         log.Info($"C# IoT Hub trigger function processed a message: {messageAsJson}");

        var data = JsonConvert.DeserializeObject<Dictionary<string, string>>(messageAsJson);

        var deviceid = message.SystemProperties["iothub-connection-device-id"];

        queueMessage = null;
         if (data.ContainsKey("humidity"))
         {
             int humidity = int.Parse(data["humidity"]);

            if (humidity > 60)
             {
                 Dictionary<string, string> overHumidityThresholdMessage = new Dictionary<string, string>
                 {      
                     { "deviceId",deviceid.ToString()},
                     { "humidity", humidity.ToString()},
                     {"message", "HighHumidityThreshold" }
                 };
                 queueMessage = JsonConvert.SerializeObject(overHumidityThresholdMessage);
             }
         }

        return new TempHumidityIoTTableEntity
         {
             PartitionKey = deviceid.ToString(),
             RowKey = $"{deviceid}{message.EnqueuedTimeUtc.Ticks}",
             DeviceId = deviceid.ToString(),
             Humidity = data.ContainsKey("humidity") ? data["humidity"] : "",
             Temperature = data.ContainsKey("temperature") ? data["temperature"] : "",
             DateMeasured = message.EnqueuedTimeUtc.ToString("O")
         };

    }
}

We now have a function that reads the device temperature and humidity reading into table storage and then sends a message to a Service Bus Topic if the temperature goes above a threshold value.

Generating your IoT Hub Shared Access Signature for your ESP 8266 using Azure Functions

In my last 2 posts I showed how you can connect your ESP 8266 to the IoT hub to receive messages from the hub and also to send messages. One of the issue I had was generating the Shared Access Signature (SAS) which is required to connect to the IoT hub. I was unable to generate this on the device so I decided to use Azure Functions. The code required is straight forward and can be found here: https://docs.microsoft.com/en-us/azure/iot-hub/iot-hub-devguide-security#security-tokens

To create an Azure Function, go to the Azure management portal click the menu icon in the top left and select “Create a Resource”

image

Search for “Function”

image

and select “Function App” and click Create

image

Complete the form

image

And click Review and Create to accept the defaults or click next and work through the wizard if you want to change from the default values.

image

Click create to kick of the deployment of your new Azure Function. Once the deployment is complete navigate to the Function by clicking “Go To Resource”. You now need to create your function.

Click the + sign next to “Functions”. I used the In-portal editor as it was the easiest to use at the time as I already had most of the code copied from the site mentioned above.

image

Click In-Portal, then Continue and choose the Webhook + API template and click Create

image

Your function is now ready for editing. It will have some default code in there to give you an idea how to start

image


We’re going to use the previous SAS code in here and modify it to accept a json payload with the parameters you need for the SAS to be created.

The json we’ll use is as follows:

{
     "resourceUri":"[Your IOT Hub Name].azure-devices.net/devices/[Your DeviceId]",
     "expiryInSeconds":86400,
     "key":"[SAS Key from IoT hub]"
}

You can get you SAS key from the IoT hub in the Azure Portal in the devices section. Click on the device

image

Then copy the Primary or Secondary key.

Back to the function. In the editor Paste the following code:

C# function

#r "Newtonsoft.Json"

using System;

using System.Net;

using Microsoft.AspNetCore.Mvc;

using Microsoft.Extensions.Primitives;

using Newtonsoft.Json;

using System.Globalization;

using System.Net.Http;

using System.Security.Cryptography;

using System.Text;

public static async Task<IActionResult> Run(HttpRequest req, ILogger log)

{

     log.LogInformation("C# HTTP trigger function processed a request.");

     string token = "";

     try

     {

          string requestBody = await new StreamReader(req.Body).ReadToEndAsync();

          dynamic data = JsonConvert.DeserializeObject(requestBody);

          int expiryInSeconds = (int)data?.expiryInSeconds;

          string resourceUri = data?.resourceUri;

          string key = data?.key;

          string policyName = data?.policyName;

          TimeSpan fromEpochStart = DateTime.UtcNow - new DateTime(1970, 1, 1);

          string expiry = Convert.ToString((int)fromEpochStart.TotalSeconds + expiryInSeconds);

          string stringToSign = WebUtility.UrlEncode(resourceUri) + "\n" + expiry;

          HMACSHA256 hmac = new HMACSHA256(Convert.FromBase64String(key));

          string signature = Convert.ToBase64String(hmac.ComputeHash(Encoding.UTF8.GetBytes(stringToSign)));

          token = String.Format(CultureInfo.InvariantCulture, "SharedAccessSignature sr={0}&sig={1}&se={2}", WebUtility.UrlEncode(resourceUri), WebUtility.UrlEncode(signature), expiry);

          if (!String.IsNullOrEmpty(policyName))

          {

               token += "&skn=" + policyName;

          }

     }

     catch(Exception ex)

     {

          return (ActionResult)new OkObjectResult($"{ex.Message}");

     }

     return (ActionResult)new OkObjectResult($"{token}");

}

Click Save and Run and make sure that there are no compilation errors. To use the function you need to post the json payload to the following address:

https://[your Function Name].azurewebsites.net/api/HttpTrigger1?code=[your function access key]

To retrieve your function access key, click Manage and copy your key from the Function Keys section

image

We’re now ready to use this in micropython on your ESP 8266. I created a function to retrieve the SAS

def getsas(hubname, deviceid, key):

    import urequests

    import ujson

    dict = {}

    dict["resourceUri"] = hubname+'.azure-devices.net/devices/'+deviceid

    dict["key"] = key

    dict["expiryInSeconds"]=86400

    payload = ujson.dumps(dict)

    response = urequests.post('https://[your function name].azurewebsites.net/api/HttpTrigger1?code=[your function access key]', data=payload)

    return response.text

In my connectMQTT() function from the first post I replaced the hard coded SAS string with a call to the getsas function. The function returns a SAS which is valid for 24 hours so you will need to retrieve a new SAS once 24 hours has elapsed.


I can now run my ESP 8266 code without modifying it to give it a new SAS each time I want to use it. I always forgot and wondered why it never worked the next time I used it. I can now both send and receive data from/to the ESP 8266 and also generate a SAS to access the IoT hub. The next step is to use the data received by the hub in an application and send action messages back to the ESP 8266 if changes are made. I look forward to letting you know how I got on with that in a future post.