Steve Spencer's Blog

Blogging on Azure Stuff

Introduction to Azure Role Based Access Control (RBAC)

Up until fairly recently I have been managing  access to a number of Azure subscriptions but as I’ve been working for smaller organisations the number of people who needed access was fairly small and easy to manage. It also meant that I generally gave the users Owner or Contributor access to the subscriptions as we were all managing everything so we needed the access at that level. Now I work for a large organisation there is a greater need to  limit access to certain areas of Azure and giving subscription wide access is limited to a few key administrators. This means that I need to look at the minimum access that is required for each of the users who need access to the resources. First I’d like to talk about the scope within which permissions can be set within Azure. For most of the scenarios I’ve worked in I have visibility of a single subscription. For organisations  with a large number of subscriptions there is a further level of scope, Management group, which I won’t be discussing.

image

Permissions can be set at the Subscription, Resource group or the individual resource scope.Depending upon the level of access your user requires there are three basic levels which you can use

  • Owner
  • Contributor
  • Reader

Owner gives the user full access to everything within the scope and can also assign roles to other users.

Contributor gives the user full access to everything within the scope except they are not able to assign roles to other users

Reader give the user access to view the resources within the scope but they are not able to change anything or assign roles.

So assigning the user the Owner role at the Subscription level, then the user can manage all resources within the subscription and assign roles to users. A user can be assigned multiple roles and Azure RBAC is additive so if a user was assigned Contributor at the subscription scope but only Reader on one of the resource groups, the Contributor role would override the reader role. It is also possible to have Deny role assignments. Where a user is Denied permissions on a specific role. Deny assignments take precedence over role assignments.

These roles plus the variety of scopes give some flexibility of access but it is still a large surface area of access that is provided. Azure offers a large number of finer grained roles to allow users to be given specific permissions to specific services. There are a large number of built in assignments as can be seen here: https://docs.microsoft.com/en-us/azure/role-based-access-control/built-in-roles

These finer grained roles allow you to set specific permissions on a specific user within a specific scope. For example if  you wanted to give a user access to a blob store to upload files via the Azure portal there are two permissions that can be set: Reader and Data Access and

Storage Blob Data Contributor. If you assign these two roles to a user in the storage account, then the user is able to login to the Azure portal and navigate to the storage account and access the blob store.

To do this, navigate to the storage account within which you want to assign a role and click the access control item

image

The click “Add role assignment”

image

In the role drop down pick “Storage Blob Data Contributor”, select the user you want to assign the role to and click save. Repeat this for the Reader and Data Access role. Your user now has access only to blob storage and has no access elsewhere in the resource group or subscription. I could have done the same thing by selecting the resource group and Access control and adding these roles there. This would have give the user access to all blob stores within the resource group.

Another example is that you may want to give someone access to your app service so that they can configure and deploy. So navigate to your App Service and click “Access control”, then select the role “Website Contributor”. See https://docs.microsoft.com/en-us/azure/role-based-access-control/built-in-roles#website-contributor for more details. This lets you manage the selected website but not app service plans and no other web sites. If you want to manage other app services then you could add the same role at the resource group level.

Exporting Logs from Application Insights using Continuous Export

This is the fifth post of my series of posts about Log Analytics and Application Insights. The previous post talked about adding custom logging to you code using Application Insights. Now you’ve got your logging into Application Insights you can run log analytics queries and build dash boards, alerts etc. Sometime though you want to use this data in other systems and it would be useful if you could export the data and use it else where. This post will show you how you can regularly export the data from Application Insights into Azure Storage. Once it is in Storage it can easily be moved into other systems or used else where such as PowerBI. This can be achieved using the Continuous Export feature of Application Insights

To enable Continuous Export, login to the Azure management portal and navigate to Application Insights. Click on the instance you want Continuous Export enabled. The scroll down the options on the left until you find the Configure section and click on Continuous Export

image

To use Continuous Export you will need to configure a storage account. Click Add:

image

Click Data types to export:

image

I was only interested in the logs I emitted from my custom logging, so selected Custom Event, Exception and Trace then clicked OK

image

Next pick a storage location. Make sure you use one where your Application Insights instance is located otherwise you will be charged egress fees to move the data to a new datacentre.

image

You can now pick an existing storage account or create a new one. Upon selecting a storage account you can pick an existing  container or create a new one.Once a blob container is selected click OK.

Continuous Export is now configured. You will not see anything in the storage container until the next set of logs are sent to Application Insights.

My log analytics query shows the following logs have been generated:

image

If you look at the continuous Export configuration page you will see that the last updated date has changed.

image

Now look in blob storage. You should see a folder that is<ApplicationInsights_ServiceName>_<ApplicationInsights_InstrumentationKey

image

Click through and you will see a number of folders. One for each of the logs that I enabled when setting up Continuous Export. Click through one of them and you will see a folder for the date and then a folder for the hour of the logs. Then a file containing the logs for that hour.

image

You will get a row of json data for each row output for the log query. Note the whole logs emitted will be in each of the folders.

e.g.

{
     "event": [
         {
             "name": "Some Important Work Completed",
             "count": 1
         }
     ],
     "internal": {
         "data": {
             "id": "a guid is here",
             "documentVersion": "1.61"
         }
     },
     "context": {
         "data": {
             "eventTime": "2020-03-22T18:12:30.2553417Z",
             "isSynthetic": false,
             "samplingRate": 100.0
         },
         "cloud": {},
         "device": {
             "type": "PC",
             "roleInstance": "yourcomputer",
             "screenResolution": {}
         },
         "session": {
             "isFirst": false
         },
         "operation": {},
         "location": {
             "clientip": "0.0.0.0",
             "continent": "Europe",
             "country": "United Kingdom",
             "province": "Nottinghamshire",
             "city": "Nottingham"
         },
         "custom": {
             "dimensions": [
                 {
                     "CustomerID": "4df16004-2f1b-48c0-87d3-c1251a5db3f6"
                 },
                 {
                     "OrderID": "5440d1cf-5d06-4b0e-bffb-fad522af4ad1"
                 },
                 {
                     "InvoiceID": "a7d5a8fb-2a2e-4697-8ab4-f7bf8b8dbe18"
                 }
             ]
         }
     }
}

As the data is now out of Application Insights you can move it where ever you need it. You will also need to manage the blob storage data too otherwise you will end up with the logs stored in two places and the storage costs will be doubled.

One example of subsequent usage is exporting the data to Event Hub. As the data is in blob storage you can use a function with a blob trigger to read the blob in a row at a time and publish the data onto Event Hub:

[FunctionName("ContinuousExport")]
public static async void Run([BlobTrigger("logs/{name}", Connection = "ConitnuousExportBlobSetting")]Stream myBlob, string name,
     [EventHub("logging", Connection = "EventHubConnectionAppSetting")] IAsyncCollector<string> outputEvents,TraceWriter log)
{
     log.Info($"C# Blob trigger function Processed blob\n Name:{name} \n Size: {myBlob.Length} Bytes");
     StreamReader textReader = new StreamReader(myBlob);
     while (!textReader.EndOfStream)
     {
         string line = textReader.ReadLine();
         log.Info(line);
         await outputEvents.AddAsync(line);
     }
}

Note: This is an example, so will need additional code to make sure that you don’t exceed the Event Hub maximum message size

So with Continuous Export you can extract your log data from Application insights and move it to other systems for processing.

Processing data from IoT Hub in Azure Functions

If you have been following my previous posts (Part 1, part 2, part 3) you will know that I’m using an ESP 8266 to send data to the Azure IoT hub. This post will show you how to receive that data and store it in Azure Storage and also show how you can also forward the data onto the Azure Service Bus.

I’m going to use Visual Studio and C# to write my function. If you are unfamiliar with Azure functions you can setup bindings to a variety of Azure resources. These bindings make it easy to interface without needing to write a lot of boiler plate code. These bindings allow your function to be triggered when something happens on the resource or also use the output bindings to write data to these resources. For example, there are bindings for Blob and Table storage, Service bus, Timers etc. We’re interested in the IoT hub binding. The IoT hub trigger will be fired when an event is sent to the underlying Event hub. You can also use an output binding to put messages into the IoT hub event stream. We’re going to use the Table storage and Service bus output bindings.

To get started you need to create a new Function project in Visual Studio.
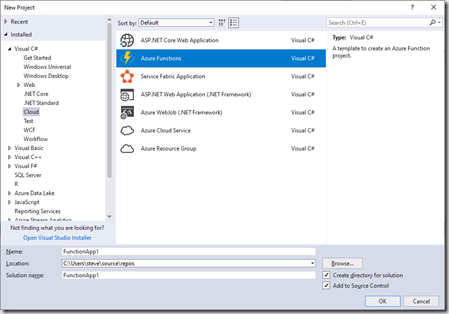
image

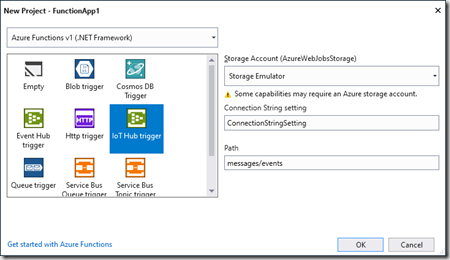
Select IoT hub trigger and browse to a storage account you wish to use (for logging) plus add in the setting name you want to use to store the IoT hub connection string.
image

This will generate your empty function with you preconfigured IoT hub trigger.

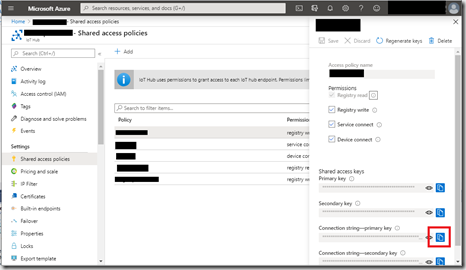
You need to add your IoT hub connection string to your setting file. Open local.settings.json and add in a new line below the AzureWebjobs settings with the same name you entered in the dialog. ConnectionStringSetting in my example.Your connection string can be found in the Azure Portal.

Navigate to your IoT hub, then click Shared Access Policies
image

Select the user you want to use to access the IoT hub and click the copy icon next to the primary key connection string.

image

You can run this in the Visual Studio debugger and when messages are sent to your IoT hub you should see a log appearing in the output window.

What I want to do is to receive the temperature and humidity readings from my ESP 8266 and store the data in Azure storage so that we can process it later.

For that I need to use the Table storage output binding. Add the binding attribute to your function below the FunctionName binding.

[return: Table("MyTable", Connection = "StorageConnectionAppSetting")]

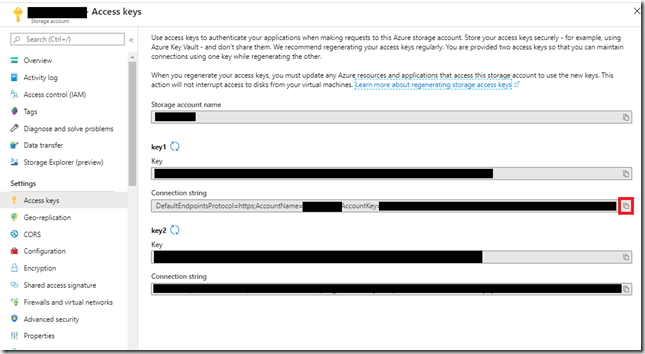
Again, you will need to add the storage setting into your config file. Find your storage account in the Azure portal, click Access keys then copy the key1 connection string and paste it in your config file
image

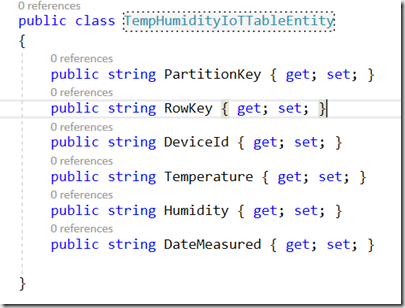
To use Azure Storage Output binding you will need to create a class that represents the columns in you table.
image

I included a device id so that I can identify which device the reading we associated to. You will need to change the return type of your function to be TempHumidityIoTTableEntity then add the code to extract the data from the message.

Firstly, I changed the python code in my ESP8266 to send the data as json so we can process it easier. I’ve also added a message identifier so that we can send different messages from the ESP8266 and be able to process them differently.

sensor.measure()

dataDict = {'partitionKey': 'r',

      'rowkey':'recneptiot'+str(utime.ticks_ms()),

      'message':'temphumidity',

      'temperature':str(sensor.temperature()),

      'humidity': str(sensor.humidity())}

mqtt.publish(sendTopic,ujson.dumps(dataDict),True)

That means we can serialise the Iot Hub message into something we can easily access. So the whole function is below:

[FunctionName("Function1")]
[return: Table("yourtablename", Connection = "StorageConnectionAppSetting")]
public static TempHumidityIoTTableEntity Run([IoTHubTrigger("messages/events", Connection = "ConnectionStringSetting")]EventData message, TraceWriter log)
{
     var messageAsJson = Encoding.UTF8.GetString(message.GetBytes());
     log.Info($"C# IoT Hub trigger function processed a message: {messageAsJson}");

    var data = JsonConvert.DeserializeObject<Dictionary<string, string>>(messageAsJson);

    var deviceid = message.SystemProperties["iothub-connection-device-id"];

    return new TempHumidityIoTTableEntity
     {
         PartitionKey = deviceid.ToString(),
         RowKey = $"{deviceid}{message.EnqueuedTimeUtc.Ticks}",
         DeviceId = deviceid.ToString(),
         Humidity = data.ContainsKey("humidity") ? data["humidity"] : "",
         Temperature = data.ContainsKey("temperature") ? data["temperature"] : "",
         DateMeasured = message.EnqueuedTimeUtc.ToString("O")
     };

}

Providing your config is correct you should be able to run this in the Visual Studio debugger and view your data in Table Storage:

image

I mentioned at the start that I wanted to pass some messages onto the Azure Service bus. For example we may want to do something if the humidity goes above 60 percent. In this example we could add a HighHumidity message to service bus for some other service or function to respond to. We’ll send the message as a json string so that we can action it later in a different service. You can easily add a Service Bus output binding to your function. However, this binding documentation shows it as another return value. There is an alternative binging that allows you to set a message string out parameter with the message contents. This can be used as follows:

    [FunctionName("Function1")]
     [return: Table("yourtablename", Connection = "StorageConnectionAppSetting")]
     public static TempHumidityIoTTableEntity Run([IoTHubTrigger("messages/events", Connection = "ConnectionStringSetting")]EventData message,
         [ServiceBus("yourQueueOrTopicName", Connection = "ServiceBusConnectionSetting", EntityType = EntityType.Topic)]out string queueMessage,
         TraceWriter log)
     {
         var messageAsJson = Encoding.UTF8.GetString(message.GetBytes());
         log.Info($"C# IoT Hub trigger function processed a message: {messageAsJson}");

        var data = JsonConvert.DeserializeObject<Dictionary<string, string>>(messageAsJson);

        var deviceid = message.SystemProperties["iothub-connection-device-id"];

        queueMessage = null;
         if (data.ContainsKey("humidity"))
         {
             int humidity = int.Parse(data["humidity"]);

            if (humidity > 60)
             {
                 Dictionary<string, string> overHumidityThresholdMessage = new Dictionary<string, string>
                 {      
                     { "deviceId",deviceid.ToString()},
                     { "humidity", humidity.ToString()},
                     {"message", "HighHumidityThreshold" }
                 };
                 queueMessage = JsonConvert.SerializeObject(overHumidityThresholdMessage);
             }
         }

        return new TempHumidityIoTTableEntity
         {
             PartitionKey = deviceid.ToString(),
             RowKey = $"{deviceid}{message.EnqueuedTimeUtc.Ticks}",
             DeviceId = deviceid.ToString(),
             Humidity = data.ContainsKey("humidity") ? data["humidity"] : "",
             Temperature = data.ContainsKey("temperature") ? data["temperature"] : "",
             DateMeasured = message.EnqueuedTimeUtc.ToString("O")
         };

    }
}

We now have a function that reads the device temperature and humidity reading into table storage and then sends a message to a Service Bus Topic if the temperature goes above a threshold value.