In my previous posts I discussed how you can manage access to applications (part 1) using Azure AD and also how you can add users users from outside of your organisation (part 2). Now we will look at how you can automate this using Graph API.
“The Microsoft Graph API offers a single endpoint, https://graph.microsoft.com, to provide access to rich, people-centric data and insights exposed as resources of Microsoft 365 services. You can use REST APIs or SDKs to access the endpoint and build apps that support scenarios spanning across productivity, collaboration, education, security, identity, access, device management, and much more.” - https://docs.microsoft.com/en-us/graph/overview
From the overview you can see that Graph API covers a large area of Microsoft 365 services. One of the services it covers is Azure AD. What I’ll show you today is how to invite users and then add/remove them to/from groups using Graph API.
There are two ways to access Graph API. A user centric approach (Delegated) that requires a user account and an application centric approach that uses an application key and secret. Accessing Azure AD for user invite and group management utilises the application centric approach. In order to get an application id and secret you will need to create an application in Azure AD. The first post in the series talks about how to create an App Registration.
Once you have created your application, there are a couple of bits of information you require in order to get started. These are the tenantId and clientId. These can be found in the Azure portal. Navigate to your App Registration and the details can be found in the Overview blade.
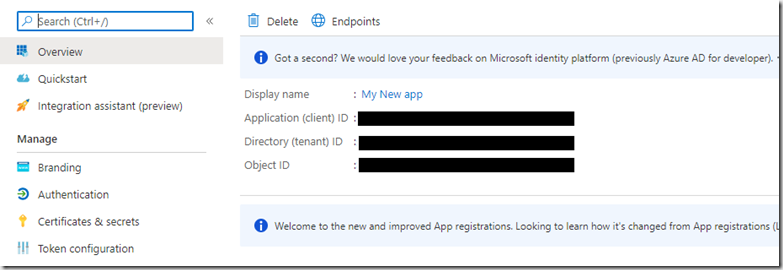
If you hover over each of the Guids a copy icon appears to allow you to easily copy these values.
Next you will need a key generating. For this you click on the Certificates and secrets blade.
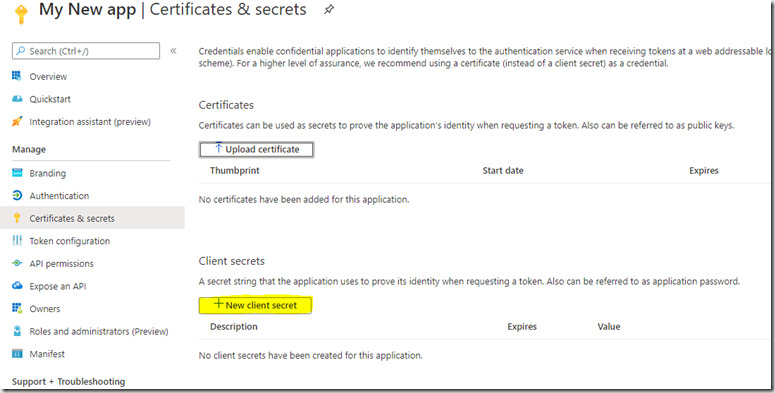
Then click “New client secret” and populate the form and click “Add”
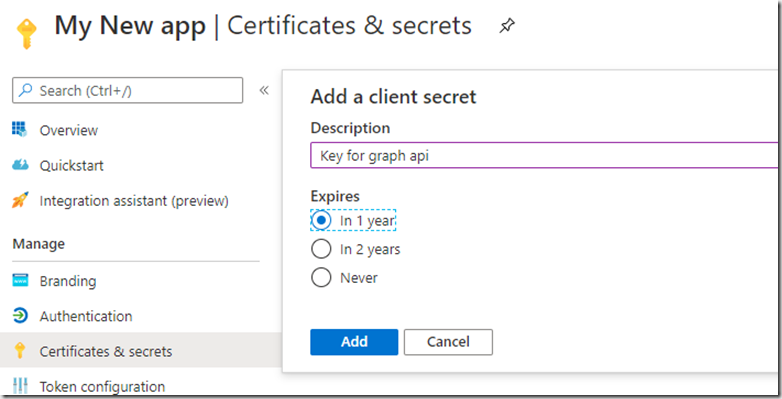
Your key will now appear.

Make sure you copy this as it is not visible again once you navigate away and you will need to generate a new one.

We are now ready to start looking at Graph API. There is good documentation about each of the functions in Graph API including the permissions required to access and code samples in a variety of languages. If we look at the list User function:
https://docs.microsoft.com/en-us/graph/api/user-list?view=graph-rest-1.0&tabs=http
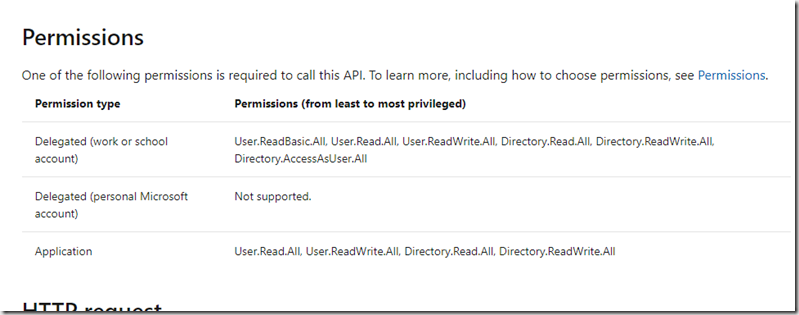
You can see the permissions needed to access this function. As we are using an Application permission type we need to set one of the permissions: User.Read.All, User.ReadWrite.All, Directory.Read.All or Directory.ReadWrite.All.
You can set the permissions required by going to your App Registration and clicking on the “API permissions”
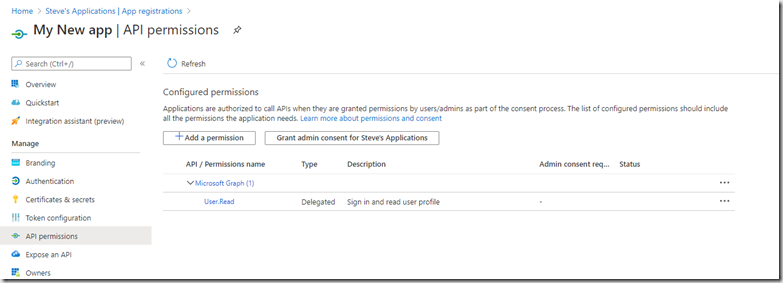
The application by default requires a user login that can read their own user profile. We need to add some additional permissions to allow our application to list the users in AD.Click on “Add permission”
This shows the list of built-in API’s that you can access. We are only looking at Microsoft Graph today
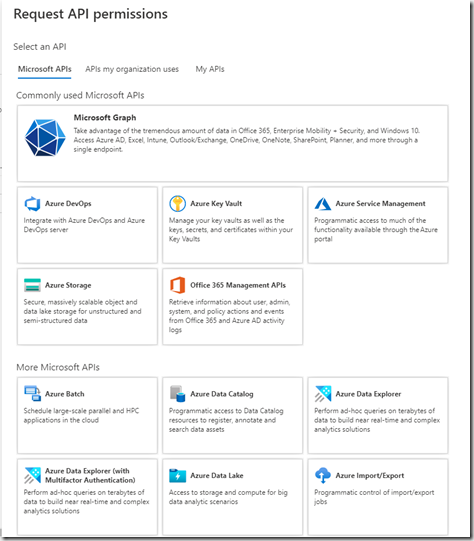
Click “Microsoft graph”

Then “Application permission” and scroll to the User section
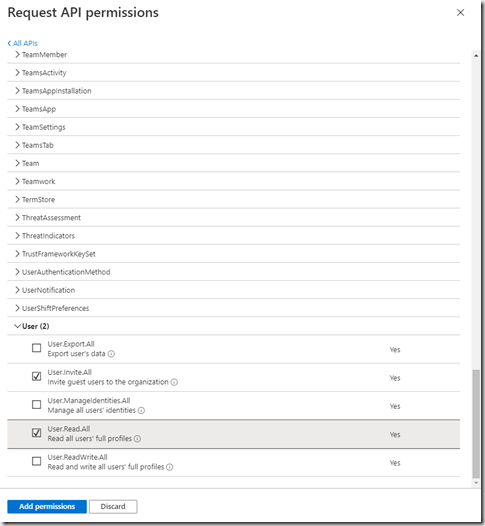
To list users we need the User.Read.All permission, but we’ll also add the User.Invite.All so that we can invite B2B users. click “Add permissions”.
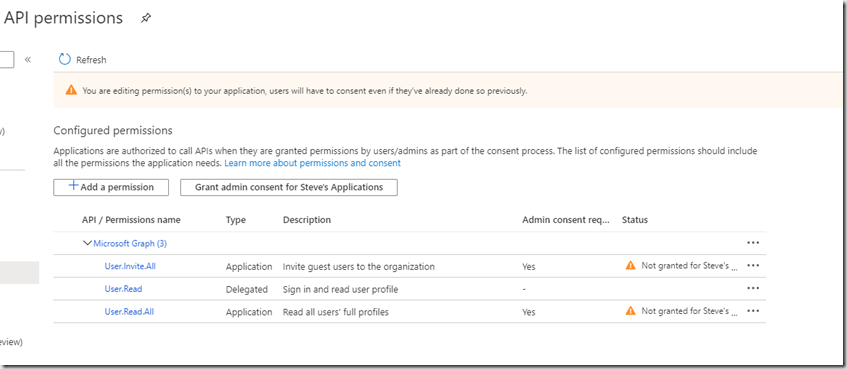
Although you have added the permissions you cannot currently access the Graph API as you will need to Grant admin consent in first. If we had added a Delegated permission then the user could try an access the Graph API but Admin consent would be required to stop anyone from accessing certain features. This can be done in a workflow with selected Admins being notified of access. Before the use can access an Administrator would need to approve each access. This process will not work for our application as it is an unattended application using the application permission type. We can however grant access to this application user by clicking “Grant admin consent …” button and clicking Yes to the message box that pops up.
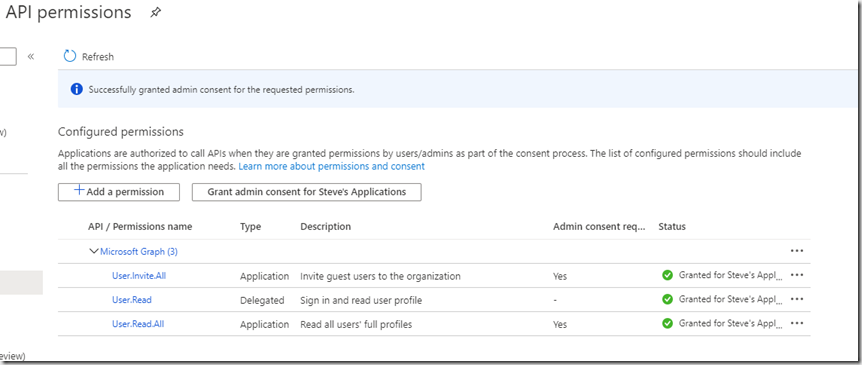
Clicking the button adds admin consent to all permissions. If you want to remove it from any, click the ellipsis (…) at the end and click “Revoke admin consent”

You can also remove permissions from this menu.
Your user is now ready to go. I’m using the C# SDK and this is available as a nuget package
Once the nuget package is installed. You will need to create an instance of the Graph API client:
ConfidentialClientApplicationOptions _applicationOptions = new ConfidentialClientApplicationOptions
{
ClientId = ConfigurationManager.AppSettings["ClientId"],
TenantId = ConfigurationManager.AppSettings["TenantId"],
ClientSecret = ConfigurationManager.AppSettings["AppSecret"]
};
// Build a client application.
IConfidentialClientApplication confidentialClientApplication = ConfidentialClientApplicationBuilder
.CreateWithApplicationOptions(_applicationOptions)
.Build();
// Create an authentication provider by passing in a client application and graph scopes.
ClientCredentialProvider authProvider = new ClientCredentialProvider(confidentialClientApplication);
// Create a new instance of GraphServiceClient with the authentication provider.
GraphServiceClient graphClient = new GraphServiceClient(authProvider);
You will need the ClientId, TenentId and Secret you copied earlier. Looking at the Graph API documentation there are example of how to use each of the functions.
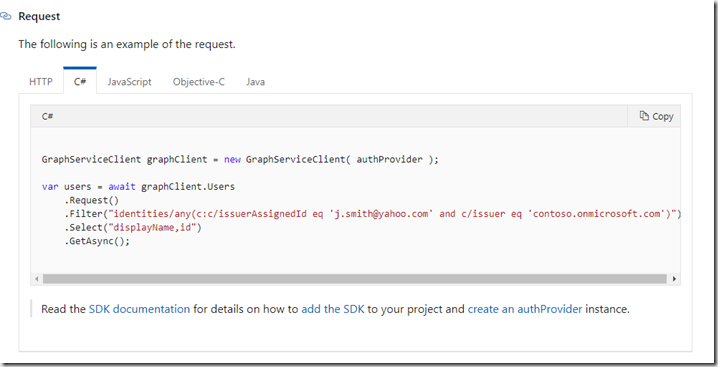
We want to see if a user existing in our AAD before we invite them, so we will use the filter option as above.
var user = (await graphClient.Users
.Request(options)
.Filter($"mail eq '{testUserEmail}'")
.GetAsync()).FirstOrDefault();
Console.WriteLine($"{testUserEmail} {user != null} {user?.Id} [{user?.DisplayName}] [{user?.Mail}]");
If user is null then is does not exist in your AzureAD tenant. Assuming that this is an external user then you will need to invite the user to be able to access your application. I created a method for this:
private async Task<Invitation> InviteUser(IGraphServiceClient graphClient, string displayName, string emailAddress, string redirectUrl, bool wantCustomEmaiMessage, string emailMessage)
{
// Needs: User.InviteAll
var invite = await graphClient.Invitations
.Request().AddAsync(new Invitation
{
InvitedUserDisplayName = displayName,
InvitedUserEmailAddress = emailAddress,
SendInvitationMessage = wantCustomEmaiMessage,
InviteRedirectUrl = redirectUrl,
InvitedUserMessageInfo = wantCustomEmaiMessage ? new InvitedUserMessageInfo
{
CustomizedMessageBody = emailMessage,
} : null
});
return invite;
}
Now you’ve just invited a B2B user into your Azure AD tenant. At the moment they do not have access to anything as you’ve not assigned them to any application. The Graph API for assigning users to applications uses the delegated permissions model which means you need to use an actual user account. The Graph API with the application permission model does not support adding users to applications. In order to use the same application client you used for inviting users, you could assign a group to your application and then use the Graph API to add/remove users to/from that group.
Adding/removing a user to/from a group requires one of the following permissions: GroupMember.ReadWrite.All, Group.ReadWrite.All and Directory.ReadWrite.All. This is set in the same way as for the user permissions in the App Registration/Api permission section mentioned earlier. Admin consent will also need to be granted for these permissions.
The code to add & remove users is below:
// find group
var groupFound = (await graphClient.Groups
.Request()
.Filter($"displayName eq '{groupName}'")
.Expand("members")
.GetAsync()).FirstOrDefault();
Console.WriteLine($"{groupName} {groupFound != null } [{groupFound?.Id}] [{groupFound?.DisplayName}] [{groupFound?.Members?.Count}]");
if (groupFound != null)
{
// check is the user is already in the group
var user = (from u in groupFound.Members
where u.Id == user.Id
select u).FirstOrDefault();
Console.WriteLine($"user Found {user != null}");
if (user != null)
{
Console.WriteLine($"removing user {user.Id}");
// remove from group
await graphClient.Groups[groupFound.Id].Members[user.Id].Reference
.Request()
.DeleteAsync();
}
else
{
Console.WriteLine($"adding user {user.Id}");
// add to group
await graphClient.Groups[groupFound.Id].Members.References
.Request()
.AddAsync(new DirectoryObject
{
Id = user.Id
});
}
}
In the code above I wanted the Graph API to return me the list of users in the group. By default you do not see this data when retrieving group information. Adding the Expand method tells Graph API to extend the query and return the additional data. This is something to bear in mind when using Graph API. Just because the data is null does not mean that there is no data, you might need to expand the data set returned.
I hope you found this a useful introduction to Graph API, I will be posting more on Azure AD in the future including more on Graph API.