Steve Spencer's Blog

Blogging on Azure Stuff

Windows Azure Platform Training Kit Update

If you attended the Black Marble Architecture Event yesterday you would have seen a number of talks around Azure and the Windows Azure Platform Training Kit was mentioned a number of times.

The latest update to the training kit is here:

http://www.microsoft.com/download/en/details.aspx?id=8396

This update includes the changes for the Azure 1.6 SDK plus updates and new demos.

The training kit is a free resource that provides a good introduction to Azure and covers a large amount including Windows Azure, SQL Azure, AppFabric (Service Bus, Caching, Access Control) plus a load of other stuff.

Windows Azure Announcements

AppFabric

Microsoft have announced two new Azure AppFabric CTPs.


May 2011 CTP will include Service bus enhancements including

  • A more comprehensive pub/sub messaging
  • Integration with the Access Control Service V2
  • Queues based upon a new messaging infrastructure backed by a replicated, durable store.

See here for more details.

June 2011 CTP will include tooling to help with building, deploying and managing Windows Azure Applications including:

  • AppFabric Developer Tools
  • AppFabric Application Manager
  • Composition Model

See here for more details

SQL Azure

The SQL May 2011 update contains the following:

  • SQL Azure Management REST API – a web API for managing SQL Azure servers.
  • Multiple servers per subscription – create multiple SQL Azure servers per subscription.
  • JDBC Driver – updated database driver for Java applications to access SQL Server and SQL Azure.
  • DAC Framework 1.1 – making it easier to deploy databases and in-place upgrades on SQL Azure.

See here for more details

Deploying Access Control Service enabled web application in Windows Azure

When deploying an Access Control Service enabled web application from my development environment to Windows Azure I got the following error:

“Unable to find assembly ‘Microsoft.IdentityModel, Version=3.5.0.0. . .”

image

This had worked well when running in the development fabric on my machine so it was strange that it failed when deployed to Windows Azure. The reason why this file cannot be found is because on my machine it is installed in the GAC and it is not in the GAC when deployed in Azure. There is a simple way to fix this and it is by configuring a Start-up task in your ServiceDefinition.csdef file to install the Microsoft.IdentityModel assembly in the GAC. When a new instance is created within Windows Azure the start up task will be run to allow things to be installed into the virtual machine prior to running your application.

Steve Marx has written an introduction to Start-up tasks as well as a Tips, Tricks and Gotchas list.


This post explains how to create a Start-up task to add an assembly to the GAC.

Error calling Azure Access Control Management Service

I’ve been developing a web application that adds rules to the access control service when a user registers with my website. This was working well using the ACS in AppFabricLabs. When I ported across to ACS V2 in the live environment I kept getting an exception thrown whenever I tried to retrieve information via the management service api.

The exception details are

The remote server returned an error: (400) Bad Request.

Status = protocol error

After investigation by looking at the latest ACS code samples on MSDN I noticed that the protocol has actually changed in the Common assembly ManagementServiceHelper.cs class. Comparing the code and copying the changes across to mine fixed the problems.

I also noticed that today that AppfabricLabs was updated last night and now uses the same protocol as V2 Live so you will need to make these changes anyway.

Windows Azure AppFabric Access Control and Cache Services Commercial Release

The first production version of the windows Azure caching service and a new production version of the Access Control service have been released. The following link provides the necessary information

http://blogs.msdn.com/b/windowsazureappfabric/archive/2011/04/11/announcing-the-commercial-release-of-windows-azure-appfabric-caching-and-access-control.aspx

In conjunction the Windows Azure Platform Training Kit and the Identity Developer Training Kit have both also been updated.


The Windows Azure Platform Training Kits adds some new labs:

  • Authenticating Users in a Windows Phone 7 App via ACS, OData Services and Windows Azure lab
  • Windows Azure Traffic Manager lab
  • Introduction to SQL Azure Reporting Services lab
  • Windows Azure AppFabric CTP February release now available

    Microsoft released on Thursday the latest CTP for Windows Azure AppFabric. Details of the release can be found here, in the AppFabric Team blog and in Wade Wegner’s blog


    The CTP contains changes to the Caching service and the AppFabric portal is now in Silverlight. The changes are as follows:

    • New Silverlight-based LABS portal, bringing consistency with the production Windows Azure portal.
    • Ability to select either a 128MB or 256MB cache size.
    • Ability to dynamically upgrade or downgrade your cache size.
    • Improved diagnostics with client side tracing and client request tracking capabilities.
    • Overall performance improvements.

    You can access the CTP by signing in to the AppFabric labs at http://portal.appfabriclabs.com/

    Creating your own identity provider for Windows Azure AppFabric Access Control

    Whilst doing an access control service demo I was asked whether you could wire in your own existing authentication mechanisms as customers did not want to have to redo their authentication/registration mechanisms to use Live ID, Google, Yahoo! etc. The answer to this was yes but I had never done it so this was a good time to investigate how.

    I started off with the Windows Azure Platform Training Kit(VS2010) and worked through the “Introduction to the AppFabric Access Control Service V2” lab to setup a web site that allows login via Live ID, Google and Yahoo!. Once this was running I needed to create my own provider and wire it into the lab solution that I just created. There is an additional lab ""Federated Authentication in a Windows Azure Web Role Application" which gives the basics of creating your own identity provider. Unfortunately this does not link to ACS so I needed to work out how to wire the provider in. The following instructions are how I created the site and wired it in:

    Taking the ACS lab solution as the basis, create an ASP.Net website that will carry out the login process. For this I added a “ASP.NET Security Token Service Web Site”. Right click on your solution and select new website. Make sure that the URL you enter for the site includes https at the start. (e.g. https://localhost/MyIDProvider).

    When the project is created, you need to change some of the code in the template as it does not handle the return address correctly when redirecting from your identity provider after logging in.

    The template for an STS web site needs the following code changing in App_Code\CustomSecurityTokenService.cs

    Go to GetScope and change the line

    scope.ReplyToAddress = scope.AppliesToAddress;

    to

    scope.ReplyToAddress = String.IsNullOrEmpty(request.ReplyTo) ? scope.AppliesToAddress : request.ReplyTo; 

    This takes the replyto address from the query string and uses this to redirect back to ACS once the login process has been completed. There are 2 other changes required to the basic STS template in order for it to work correctly.

    Open web.config and search for IssuerName in the application settings section and change it to be the url of your STS website (e.g. https://localhost/MyIDProvider)

    Also change the SigningCertificateName to point to a certificate that exists in your local machine certificate store. This website will now provide a simple mechanism for logging in. Without any changes you can enter any username and it will authenticate. At this point you will need to wire in your own authentication mechanism, but for testing purposes the default site will allow you to set it up correctly and test it out.

    We now need to wire this into ACS. I am using the labs version of the access control service at https://portal.appfabriclabs.com/.

    Navigate to your Access Control Service at appfabriclabs.

    Click “Identity Providers”, “Add Identity Provider” and add a new “Microsoft Active Directory Federation Service 2.0” provider. The two bits that are important are “WS-Federation metatdata” and the relying party application. Browse to the FederationMetadata.xml file of your STS project you have just created. (e.g. C:\inetpub\wwwroot\MyIDProvider\FederationMetadata\2007-06\FederationMetadata.xml). Also ensure that the ACS website created as part of the labs is checked and press Save.

    The final piece of configuration that is required is to add in the rules for your provider. still in the Access Control Service portal, click “Rule Groups”, select the rule group that you setup for your ACS lab and select “Generate Rules”. Ensure that your new identity provider is in the list and that it has been checked and press the “Generate” button. Two new rules should have been added for your provider (Pass through for name and role). You are now ready to test this.

    To make it easier to see what is happening I added the following to the Default.aspx of my ACS lab

    In default.aspx add the following:

        <asp:LoginView ID="LoginView1" runat="server">
            <AnonymousTemplate>
                <asp:Panel Visible="true" CssClass="secretContent" runat="server" ID="unauthorisedContent">
                You are unauthorised to view this page
                </asp:Panel>
            </AnonymousTemplate>
        
            <LoggedInTemplate>
                    You are logged in
            </LoggedInTemplate>
            <RoleGroups>
                <asp:RoleGroup Roles="Administrator">
                    <ContentTemplate>
                        <asp:Panel ID="SecretContent" runat="server" CssClass="secretContent" 
                            Visible="true">
                            Secret Content (Only administrators can access this section)
                        </asp:Panel>
                    </ContentTemplate>
                </asp:RoleGroup>
            </RoleGroups>
        </asp:LoginView>

    This will display the login status so you can see whether the login works or not.

    Also add the following style to the site.css file in the ACS lab site:

    .secretContent
    {
      border-style: solid; 
      background-color: Red; 
      padding: 5px;
      color: White;
    }

    Run the ACS lab application and check to see if your provider appears in the list of providers and also that when you click on the button it redirects to you page. Login and you should be redirected to the Default.aspx page of the ACS lab site with the text “you are logged in”.

    You may want to change the claims that are allowed for specific users. This is done in App_Data\CustomSecurityTokenService.cs in your identity provider web site.

    Modify GetOutputClaimsIdentity to change depending upon who is logged in.

    Change the code that adds a Manager Role to the following code to allow a user called Steve to be an administrator and everyone else as a user.

    if (principal.Identity.Name.Equals("Steve") == true)
    {
        outputIdentity.Claims.Add(new Claim(ClaimTypes.Role, "Administrator"));
    }
    else
    {
        outputIdentity.Claims.Add(new Claim(ClaimTypes.Role, "User"));
    }

    Run your ACS website again and login with “Steve” and you should now see the secret content that only administrator should see. Login as anyone else and you will not see the secret content.

    All that you need to do now is to wire in your own authentication mechanism and deal with the claims for each user.

    Azure Jumpstart and Accelerator links

    Thanks for attending the Azure Jumpstart and Accelerator events in Dublin and Belfast (also the Galway Live Meeting).

    Here are the list of links from my presentations:

    Azure HOL (August labs = VS2008, November Labs = VS2010)

    http://bit.ly/d16e3M (Update: 7 Jan 2011 : Looks like this link does not give the 2008 option any more)

    Also include the December update for Azure SDK 1.3 for VS2010 (http://www.microsoft.com/downloads/en/details.aspx?FamilyID=413E88F8-5966-4A83-B309-53B7B77EDF78&displaylang=en#RelatedResources)

    Shared Access signatures

    http://blog.smarx.com/posts/shared-access-signatures-are-easy-these-days

    CNAME mappings to CDN URLs

    http://blog.smarx.com/posts/using-the-new-windows-azure-cdn-with-a-custom-domain

    Adaptive Streaming can be made to work with the CDN too

    http://blog.smarx.com/posts/smooth-streaming-with-windows-azure-blobs-and-cdn

    Ticket Direct Case study

    http://www.microsoft.com/casestudies/Case_Study_Detail.aspx?casestudyid=4000005890

    MSDN offers

    http://www.microsoft.com/windowsazure/offers/default.aspx

    Patterns Azure Guidance

    http://wag.codeplex.com/

    Windows Azure AppFabric Labs (to see the latest changes to App Fabric)

    https://portal.appfabriclabs.com/

    Steve Spencer's Blog | All posts tagged 'MQTT'

    Steve Spencer's Blog

    Blogging on Azure Stuff

    Sending data from the ESP 8266 to the Azure IoT hub using MQTT and MicroPython

    In my previous post I showed you how to connect your ESP 8266 to the Azure IoT hub and be able to receive messages from the IoT hub to turn on a LED. In this post I'll show you how to send data to the IoT hub. For this I need to use a sensor that I will read at regular intervals and then send the data back to the IoT hub. I picked a temperature and humidity sensor I had from the kit of sensors I bought

    image

    This sensor is compatible with the DHT MicroPython library. I order to connect to the IoT hub use the same connect code that is in my previous post. The difference with sending is you need a end point for MQTT to send you temperature and humidity data to. The topic to send to is as follows:

    devices/<your deviceId>/messages/events/

    So using the same device id as in the last post then my send topic would be devices/esp8266/messages/events/

    To send a message to the IoT hub use the publish method. This needs the topic plus the message you want to send. I concatenated the temperature and humidity and separated them with a comma for simplicity

    import dht

    import time

    sensor = dht.DHT11(machine.Pin(16))

    mqtt=connectMQTT()

    sendTopic = 'devices/<your deviceId>/messages/events/'

    while True:

        sensor.measure()

        mqtt.publish(sendTopic,str(sensor.temperature())+','+str(sensor.humidity()),True)

        time.sleep(1)

    The code above is all that is required to read the sensor every second and send the data to the IoT hub.

    In Visual Studio Code with the Azure IoT Hub Toolkit extension installed, you can monitor the messages that are sent to your IoT hub. In the devices view, right click on the device that has sent the data and select “Start Monitoring Built-in Event Endpoint”

    v NO FOLDER OPENED 
You have not yet opened 
Open Fol 
> OUTLINE 
v AZURE IOT HUB 
v o recnepsiotu)l 
> Modules 
> Interfaces (Preview) 
Send D2C Message to 10T Hub 
Send C2D Message to Device 
Invoke Device Direct Method 
Edit Device Twin 
Start Monitoring Built-in Event Endpoint 
Start Receiving C2D Message 
Generate Code 
Generate SAS Token for Device 
Get Device Info 
Copy Device Connection 
Delete Device 
> Distributed Tracing Setting (Preview) 
> Endpoints 
"body": "23 54 
"applicationPro 
"mqtt-retain" 
[ 10THubFbni tor]

    This then displays the messages that are received by your IoT hub in the output window

    PROBLEMS 
OUTPUT DEBUG coNSOLE 
Azure IOT Hub Toolkit 
[10THub"bnitor] Created partition receiver [1] for consumerGroup [$Defau1t] 
[10THub"bnitor] [9:12:39 PM] Message received from [recnepsiotoøl] : 
"body": "23 54 
"applicationproperties 
"mqtt-retain": "true 
[10THubFbnitor] [9:14:28 PM] Message received from [recnepsiotoøl] : 
"body": "23,54 
"applicationproperties 
"mqtt-retain": "true

    You can see in the body of the received message the temperature and humidity values that were sent.

    I still need to sort out generating the Shared Access Signature and also programmatically access the data I send to the IoT hub. I hope to have blog posts for these soon.

    Connecting the ESP 8266 to Azure IoT Hub using MQTT and MicroPython

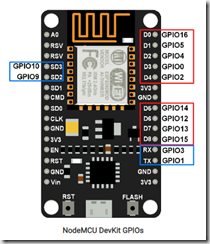
    Recently  was introduced to the ESP 8266 processor which is a low cost IoT device with built in Wi-Fi, costing around £3 - £4 for a development board. The thing that interested me (apart from price) was the device is Arduino compatible and will also run MicroPython. The version I purchased from Amazon was the NodeMcu variant with built in power and serial port via a microUsb port, so it makes an ideal board to start with as there are no additional components required.
    clip_image001

    This board however did not have MicroPython installed and that required a firmware change. The instructions were fairly straight forward and I followed this tutorial.

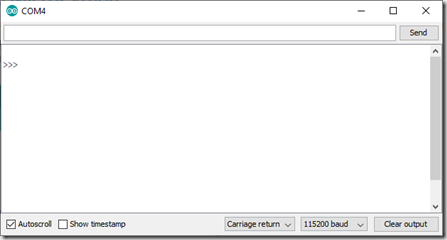
    After installing MicroPython you can connect to the device using a terminal emulator via the USB serial port. Check in Device Manager to find the COM port number and the default baud rate is 115200. I used the Arduino Serial Monitor tool. In the terminal emulator you can press enter and you should get back the python REPL prompt. If not then you have the COM port or Baud rate wrong.
    image

    You can write you python directly into here but its easier to write the python in you PC then run it on the device. For this I use ampy

    In Command Prompt install ampy using:

    pip install adafruit-ampy

    This allows you to connect to your device. Close the terminal emulator to free up the COM port then type the following to list the files on your device:

    ampy --port COM4 --baud 115200 ls

    The MicroPython Quick Ref will summarise how to access the GPIO ports etc but in order to connect to the IoT hub you will need to configure the Wi-Fi on the device. This can be done using the network module.

    So create a new text file on your PC and write the code to connect to your Wi-Fi. To test this you can use ampy to run the python on the device:

    ampy --port COM4 --baud 115200 run networking.py

    Its a good idea to use print statements to help debug as once the run has complete the output will be reflected back in your Command Prompt.

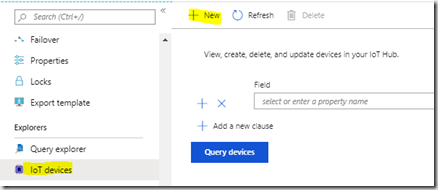
    Now you are connected to Wi-Fi we can start to look at connecting to the IoT hub. I am assuming that you already have your IoT hub set up. We now need to configure you new device. Navigate to the IoT hub in your Azure Portal. In Explorers click IoT Devices, then New
    image

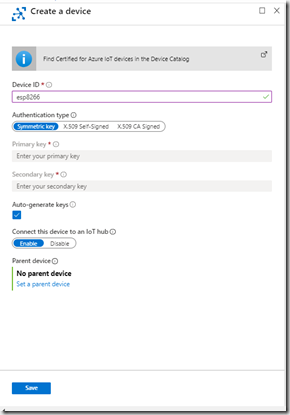
    Enter your device id, the name your device will be known as. All your devices need a name that is unique to your IoT hub. Then click Save. This will auto generate the keys needed to generate the shared access signature needed to access the IoT hub later.
    image

    Once created you may need to click refresh in the devices list to see you new device. Click the device and copy the primary key, you will ned this for later to generate the Shared Access Signature used in the connection string. In order to generate a new Shared Access Token you can use Visual Studio Code with the Azure IoT Hub Toolkit extension installed. This puts a list of devices and endpoints in the explorer view and allows you to create a new Shared Access Token. find your device in the Devices list, Right click and select Generate SAS Token For Device
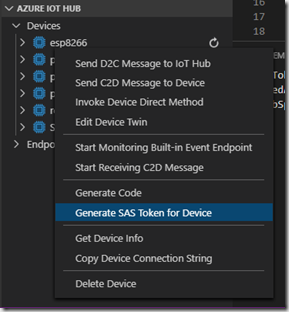
    image

    You will be prompted to enter the number of hours the token is valid for and the new SAS token will appear in the output window:

    image

    SharedAccessSignature sr=[your iothub name].azure-devices.net%2Fdevices%2Fesp8266&sig=bSpX6UMM5hdUKXHfTagZF7cNKDwKnp7I3Oi9LWTZpXI%3D&se=1574590568

    The shared access signature is made up of the full address of your device, a time stamp indicating how long the signature is valid for and the whole thing is signed. You can take this an use it to test your access to IoT hub, so make sure you make the time long enough to allow you to test. The ESP8266 doesn't have a clock that can be used to generate the correct time so you will need to create the SAS off board. I’m going to use an Azure function with the code here to generate it.

    Back to Python now. In order to connect to the IoT hub you will need to use the MQTT protocol. MicroPython uses umqtt.simple.

    There are a few things required before you can connect.

    Firstly the Shared Access Signature that you created above.

    Next you will need to get the DigiCert Baltimore Root certificate that Iot Hub uses for SSL. This can be found here. Copy the text from -----BEGIN CERTIFICATE----- to -----END CERTIFICATE-----, including both the Begin and End lines. Remove the quotes and replace the \r\n with real new line in your text editor then save the file as something like baltimore.cer.

    Next you will need a ClientId. For IoT hub the ClientId is the name of your device in IoT Hub. In this example it is esp8266

    Next you will new a Username. For IoT hub, this is the full cname of your IoT Hub with your client id and a version. e.g. [your iothub name].azure-devices.net/esp8266//?api-version=2018-06-30

    The following code should allow you to connect to the IoT Hub:

    def connectMQTT():
         from umqtt.simple import MQTTClient

        CERT_PATH = "baltimore.cer"
         print('getting cert')
         with open(CERT_PATH, 'r') as f:
             cert = f.read()
         print('got cert')
         sslparams = {'cert':cert}

       CLIENT_ID='esp8266'
         Username='yourIotHub.azure-devices.net/esp8266/?api-version=2018-06-30'
         Password='SharedAccessSignature sr=yourIotHub.azure-devices.net%2Fdevices%2Fesp8266&sig=bSpX6UMM5hdUKXHfTagZF7cNKDwKnp7I3Oi9LWTZpXI%3D&se=1574590568'


        mqtt=MQTTClient(client_id=CLIENT_ID,server='yourIotHub.azure-devices.net',port=8883,user=Username,password=Password, keepalive=4000, ssl=True, ssl_params=sslparams)


         mqtt.set_callback(lightLed)
         mqtt.connect(False)

        mqtt.subscribe('devices/esp8266/messages/devicebound/#')
         flashled(4,0.1, blueled)


        return mqtt

    set_callback requires a function which will be called when there is a device message sent from the IoT Hub. Mine just turns a Led on or off

    def lightLed(topic, msg):
         if msg== b'on':
             statusled.on()
         else:
             statusled.off()

    connect(False) means that the topic this device subscribes to will persist after the device disconnects.

    I’ve also configured the device to connect to its bound topics so that any message sent to the device will call the callback function.

    Now we need to have a process loop so that we can receive the messages. The ESP8266 does not seem to run async code so we need to call the wait_msq function to get any message back from the IoT hub

    mqtt=connectMQTT()
    print('connected...')
    while True:
         mqtt.wait_msg()

    save your python as networking.py (and make sure that all the code you wrote initially to connect to Wi-Fi is included) then run ampy again:

    ampy --port COM4 --baud 115200 run networking.py

    Your device should run now. I’ve used the Led flash to show me progress for connecting to Wi-Fi then connecting to IoT Hub and also through to receiving a message. There is a blue LED on the board which I’ve been using as well as a standard LED which is turned on/off based upon the device message received from the IoT Hub. The blue LED is GPIO 2.

    In order to send a message from the IoT hub to your device then you can do this from the Azure Portal in the devices view. Click on the device then click Message To Device
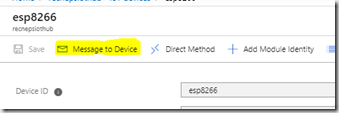
    image

    Enter the Message Body (on or off) and click Send Message
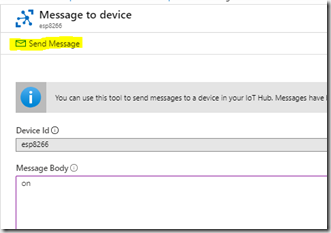
    image

    Alternatively you can do this in Visual Studio Code by right clicking the device and selecting Send C2D Message To Device and enter the message in the box that pops up
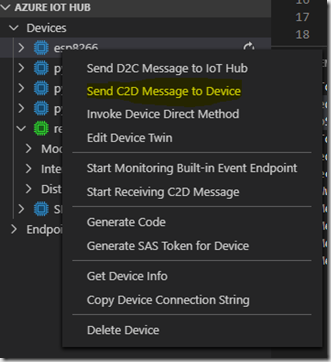
    image

    In my example the Led lights when I enter on and turns off when I enter off. ampy is likely to timeout during this process, but that’s ok as the board will still be running. As we’ve put the message retrieval inside a loop then the board will continue to run. To stop it running you will need to reset the board by pressing the reset button.

    My next step is to sort out automatically generating the Shared Access Signature  and then I’ll look at sending data to the IoT Hub